Thursday, January 31, 2013 | By: Rita Hutcheson-Cobbs

Scrapbooking: Givers from the Heart

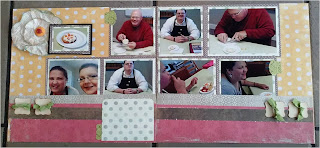
 Special Ministries Sunday School Classes love to be givers and this class was no exception. We took the months of November and December of 2011 to make gifts for family members of their choice and then we gave to church members of their choice. They decoupaged plates, made glass block lights, handmade cards and candles. They had such fun doing this and had such a sweet spirit as well as a caring heart in giving.

I kept the scrapbooking simple with paper, ribbon which was used on one of the projects, and buttons. Then I added small journaling blocks to the side.

I want to remember these moments for a very long time. It was a time of joy for me and creating these pages was a time to the end of a healing for me. We enjoyed teaching this class and to spend everyday with Madison and Garrett is a gift we are thankful for continuously. They are truly givers from the heart in so many ways. Sometimes keeping scrapbook pages simple is all that you really need to express exactly what you want to say from the photographs.

Hugs, Rita
Wednesday, January 30, 2013 | By: Rita Hutcheson-Cobbs

Scrapbooking: Using paper scraps and pieces

 What do I do with all these scraps? For me that's easy. I have a 12x12 plastic box that is about 3" deep. It closes securely so that if I want to take it with me, I don't have to worry and I can take it with me. However, when I finish scrapbooking, especially at a weekend crop, I will allow about an hour to go through my scraps, trimming them down to usable pieces. That is where these pieces came from for this page. I cut the strips behind the photograph, adhered them to 4 ATG strips of tape adhesive on a piece of cardstock that was also in my scrap box, then placed it on my page. Also, I used a piece of scrap paper and cut it out the shape of a shipping tag and placed it to the side for an embellishment. Creative...

 Here is one of my favorite things to do and I have mentioned it in my blog as well as on my videos. Use your punches for embellishments!! They are perfect!! I love doing that and you can use them for simple journaling as well.

Just another quick glimpse at the paper pieces...
Think outside the box and you can not only find creative ways
to use your scraps, but save money too!

Hugs, Rita

Tuesday, January 29, 2013 | By: Rita Hutcheson-Cobbs

Scrapbooking: Our Decorated Tea Cake Cookies

Leading the small Special Ministries Sunday School class, we made it creative! Wanting each person to learn the truths of the lessons of that day, as well as gain mobility, confidence, inspiration and so much more that each individual needed to make it day to day regardless of their present situation. We wanted to create fun and happiness. One of my favorite times was when we decorated tea cake cookies with icing and candy corn...

 As I scrapbooked these photographs, I brought in the colors related to fall without taking away from the brightness of the photographs. I love the smiles on Madison and Garrett. They are wonderful and I am so glad I get to share everyday with them...

 Then I realized at the crop I didn't have any flowers, so I made one using scraps of paper, the top to one of my containers and the lid to a tea pot. I wadded them up, sprayed them with glimmer mist, let them dry and who-la, flowers. Then I raised the key photograph with pop-dot adhesive.

 Using my favorite tab punch, I can attach it to photographs, either as a whole or by cutting it in half and savoring each piece, and adding the name and date of the one in the photograph or other simple journaling. I do like matting my photographs too, giving the page a sweet element.

Using another favorite punch I created my own personalized embellishment by adding ribbon and distressing the edges. Then on the opposite page I turned them at a different angle. I also use these for simple journaling on my pages. Both of these punches are excellent to use in art journaling or personal journaling to highlight dates, events or lists you want to specifically mark.

I had such fun scrapbooking this and other pages at a wonderful weekend away with some girls I have adopted as my sisters. They are all indeed sisters in real life and their mom joined us for the weekend as well. It was so much for to scrapbook, laugh and share something in common that we all have. I am still working on photographs from 2011,. but I am making progress lol...I just need to scrapbook more often...=) The recipe for these delicious cookies is posted...

Hugs, Rita
Monday, January 28, 2013 | By: Rita Hutcheson-Cobbs

The Handy Dandy Pastry Machine...where have you been all my life...yummm

 We love gadgets in our kitchen! They are such fun. Going to kitchen stores is always a treat for my husband, Jerry, and I because we both love to cook. We love to see what is out there and surf the internet to see what people are using. Rarely do we buy these items for ourselves, but every once and a while someone pops one in our stocking for Christmas or another sweet holiday. That's what happened this year. My best girlfriend, Madison, gave me a basket of chicken pot pie makings and THIS fabulous pastry maker...OMy what a fun thing she did...

 I used all the ingredients she gave me to make my first chicken pot pies for this jewel. I quickly decided that if you are making for a family of 6, then you need to NOT use this tool if you plan to eat them for supper in like an hour. Because you have to cool down the machine between making each set of pies or whatever you are making with the pastry machine. However, with that said, it is totally worth the effort. I think making them for the freezer or for a supper of two or three, perfect....

 The first pies...I wouldn't share due to their appearance...we decided it was the one working the machine rather than the machine lol. However,....

Regardless of how they looked the first time through...

They tasted fabulous...

 The pastry machine also came with cutters for pie toppers and we used them on the tiny bits of dough and made some mini pastry cookies...

 Sprinkled them with cinnamon, sugar and put them on parchment paper and popped them in the oven at 350 degrees...

Very nice cookies indeed....

 The first morning, Madison came over after Christmas, I made pumpkin muffins for breakfast using the pastry maker...


So...good...I even popped a piece of cream cheese inside each one...
fat-free cream cheese that is...

Delicious! I think it is fun to consider something like this as a gift. One never knows what you might find enjoyable and fun. Creating fun breakfasts or a sweet pie filled with reminders of days gone by or new ones to come, making something delicious and making memories in the kitchen is heart warming... Thank you, Madison, for creating this for us.

Hugs, Rita
Sunday, January 27, 2013 | By: Rita Hutcheson-Cobbs

Handmade Rocker Cushion Pillowcases for Madison's Favorite Rocker...

 When Madison comes to my house, she has a favorite rocker she likes to sit in to watch the series of Bill Gaither DVDs that is sure to follow after she arrives. If you haven't met Madison in my blogs or followed my posts on Facebook, you have missed the pleasure of our having a girl at our house after having all these boys in our life. I was in a conversation with her mother one day, just over a year ago, and Madison's sitter had quit to pursue other callings in her amazing life and Madison needed somewhere to go after school. Well, I was like, "Let her come over to our house, we won't notice one more. lol" So, she has fit in very nicely. It is no surprise that this is her favorite chair.  When Madison's mom, Dee, asked to use the rocker at Madison's 16th birthday party, she also wanted me to make cushions for it...here is the quick job I did...

 As you can see in the first photograph, I made simple sleeves like pillowcases. I didn't use a pattern, I simply measured the chair and the cushions and cut. I serged the seems and hemmed the top adding the ribbons. Here is the top back...

 The cushions fit perfectly together. I was pleased at the fit. The coverings are washable too. That will work well for Madison since she enjoys her snack time relaxing in this chair too. =)

Ties for the back of both cushions...wait till you see the inside...

Simple but elegant...
May add some bling to the back cushion or embroiderer her name...

 Now, for the twist to the cushions. I didn't have access to a protective padding, so took a trash bag and served the bottom cushion inside the trash bag.

The plastic zipped right through...
If the bag tears, I can replace it, but the foam cushion is protected...

Serged...sealed...protected...

Perfect for what I needed...
I will use this again and again for elder caregiving and all my caregiving... 

 Then I inserted it into the pillowcase covering number one that I made complete with ribbon ties. 

I also, protected the ends of the ribbons with fray-check to keep the ends from unraveling.

Then I inserted pillowcase number one with ribbons to the closed end
into pillowcase number two, tied the ribbons of that pillowcase to the rocker...
Done!!! Sweet...all made in just a single morning. 
I loved this quick and easy project. 

Even a few tiny pieces for the birds to make their nests...
My favorite part at the end of any project is to scatter these in my yard...

Happy Sweet 16th Birthday to Madison...
We love you...
Hugs, Rita

Saturday, January 26, 2013 | By: Rita Hutcheson-Cobbs

Rita's Lemon-Pepper Salmon Fish Tacos...

Salmon and tacos!!! OMGosh!!! I have never tried fish tacos but after hearing so conversations about them at the coffee shop and on my favorite foodie television shows, I had to try some. However, I didn't want to go out to eat them, not knowing what exactly might be in them. So, I decided to make them at home.

 I had all the ingredients on hand that most online recipes called for, but the fish I wanted to use regardless of any other recommendations I found, was salmon. I had fillets already in the freezer for those times Jerry was out of town and I could make them for Garrett, who loves grilled salmon.

The results was out of this world! The flavor just erupted a celebration party in my mouth that brought so many flavors together. Then when I added the fish to the corn tortilla and the sauteed spinach...wow! Delicious. So, here is my take on this thing called, the Fish Taco...

2 lbs of salmon filets, slightly frozen works great for cubing
2 tablespoons of lemon juice
1/2 teaspoon of fresh ground black pepper
1 teaspoon of minced garlic
1 tablespoon of fresh chopped parslay
2 teaspoon of fresh chopped rosemary (more or less depending on if you like this herb)
sea salt

Spray an iron skillet generously with cooking spray. Brown the salmon lightly in the iron skillet on medium high but don't crown the salmon. I allow the salmon to remain a bit pink because that's the way I like it, however, you can fix fish the way you best enjoy it. I wanted a bit of brown to compliment my corn tortilla. That was why I used the higher temp so that it would brown quickly, but not so much so that it would keep me from having the pinkish color on the inside...I tried a couple of pieces before cooking the whole batch.

After the salmon is finished, wash the skillet and reseason it with the cooking spray and place back on the medium high heat. Brown the pure corn tortillas on both sides, taking about 1 minute each side. Fold over and rest them on a plate lined with paper towel. You will need to prepare 8 corn tortillas.

Layer the Sauteed Spinach (recipe from yesterday's blog post), lettuce for crunch, sour cream, salmon, cheese and black olives...wow...Totally enjoy...btw, these are also gluten free!

I also made a side skillet of 2 lbs of ground turkey and 1 lb lean ground beef taco meat that I made in the microwave for the family members who don't eat fish. I also served my version of Paula Deen's black-eyed peas with tomatoes and peppers which is also available in my blog recipes. My family LOVED this combo...next, I will try tuna and soooo want to get the equipment to make my very own TORTILLAS!!! I will totally take photos of doing that step by step lol...Bet I get messy...

Hugs, Rita
Friday, January 25, 2013 | By: Rita Hutcheson-Cobbs

Fresh Sauteed Sweet Spinach has never been so easy!!

I never knew that offering fresh spinach on our table for dinner or any meal could be this easy! I have even added it to recipes and the twist has been amazing! This recipe brought such a different twist to our taco dinner the other night that I wanted to share it before I got to the fish taco recipe I want to share...

I simple took an iron skillet and sprayed it generously with cooking spray. I chopped finely a large sweet onion, a Gala apple, and two stalks of celery. I sauteed them until they were golden brown. The fragrance is fantastic. Then I took a bag of fresh spinach and placed it in the skillet, added 1/4 cup of fat-free, gluten free chicken broth and covered. The spinach cooked down and was amazing. I added some fresh ground pepper and called the dish down. The apples gave the dish it's own sweet flavor. I have made this a number of times and can't wait to try it with other greens...

Hugs, Rita
Thursday, January 24, 2013 | By: Rita Hutcheson-Cobbs

Rita's Version of Paula Deen's Black-eyed pea salad with tomatoes and peppers...

 I have fallen in love with cooking! I had no idea it could be so much fun! Plus aren't you loving that it is almost the end of January and I am still holding true to my February 2nd promise...to not take down my Christmas decorations until then!!! Thus the holiday table cloth ((sing, sing voice lol))...So, my sweet friend and Madison's mom, Dee Walker, brought me this magazine, "Woman's Day, Slim-down with Paula Deen", and showed me several recipes that she thought I would love to make for my family. This recipe was one of them. I tweaked it just a bit and will include my version below.

It is fantastic! I think regardless if you made it warm or cold, it would still be wonderful for a picnic, a church fellowship, a family gathering, PLUS it is a healthy choice and filled with body soothing properties. Let's get cooking...

Rita's Version of Paula Deen's
Black-eyed pea salad
with tomatoes and peppers
(cold or warm...both recipes are here!!!) 

2 tablespoons balsamic vinegar
1 clove garlic, minced
1 tablespoon Splenda brown sugar
salt and fresh ground black pepper
2 15.5oz cans black-eyed peas, rinced
2 15.5oz cans tomatoes, diced in garlic, spices, drained, not rinced
1 green bell pepper, diced
1 red bell pepper, diced
1 yellow bell pepper, diced
1 medium sweet onion, diced
1/2 cup fresh parsley, chopped finely

In a large bowl, mix all the ingredients together, coating tomatoes and peas well. Set in refrigerator to chill for  1 hour and serve. Wonderful!!

You can also serve this warm...

Using the Tupperware StackCooker, put 1/2 cup water in the small casserole dish and spray the steamer well with cooking spray. Add the onions, peppers, garlic, salt and pepper to the steamer, cover and microwave on high for 3 minutes or until they are tender. Remove and pour into the large casserole dish. Add remaining ingredients and place back into the microwave for 3 minutes. The dish is fantastic...

Enjoy...
Hugs, Rita

Wednesday, January 23, 2013 | By: Rita Hutcheson-Cobbs

Rita's Version of the FoodNetwork's Rockin' Awesome Stuffed Peppers...

 While at the grocery store last week, I saw the FoodNetwork Magazine cover and was immediately taken by what I saw...Mouth watering cheese dripping down the side of beautiful summer peppers. After the snow, rain and cold here in Alabama, the sun was finally shinning. It was a bright, sweet photo of inspiration for me. I said to Madison, "Let's go see how much the peppers are, Girlfriend," and off we went. Fortunately, I had most of the ingredients in the pantry at home...The results later that evening...so glad you asked lol...


YUMMMYYYYY!!!!
I did play with the original recipe a bit because there just wasn't enough flavor for us.
So, here is what I did...

 1 1/2 cups of white instant rice, cooked and drained
6 bell peppers, tops cut off and cored (any color)
2 sweet onions, diced
2 Gala apples, peeled, cored, diced
6 fresh mushrooms, chopped
2 tablespoons garlic, minced
1 lb of lean ground beef, cooked and drained
1 lb of ground turkey, cooked and drained
2 cups of Kraft fat-free cheddar cheese, shredded
1 cup of Kraft fat-free mozzarella cheese, shredded
3 tablespoons Worstershire Sauce
2 teaspoons of soy sauce
3 tablespoons parsley, chopped
2 tablespoons cilantro, chopped
1 teaspoon fresh ground pepper
1 tablespoon of ground dry mustard
1/2 teaspoon sea salt

For Sauce:
1/4 cup of above mixture
1 15oz can of petite diced tomatoes with garlic and olive oil
1 teaspoon of Splenda brown sugar
1/2 teaspoon grown cinnamon (more if desired)

Prepare the rice per the package instructions. Hint: I make mine in the microwave using a glass covered bowl with equal part of water and rice for 5 minutes, but length of time depends on the watts of your microwave. I Prepare your ground beef and ground turkey. Hint: if you have this done ahead of time, in the freezer, then thaw and who-la, you are ready for this recipe. However, you can also use the Tupperware StackCooker to prepare these meats in 10 minutes in the microwave and tenderize the onions and mushrooms too all at the same time! 

If the pepper aren't standing up straight, you can cut off the bottom slightly, but don't cut through to the inside. You can also wrap the bottom in a tad of foil but it won't sink into the delicious peppers as much of the sauce and bath in it as I love for them to do. Now let's get cookin'...

Preheat the oven to 400 degrees. Spray a glass baking dish with cooking spray. Mix all the ingredients together minus the cheese reserving 1/4 cup of the mix for the sauce. Stuff the peppers with the mixture and place each on in the backing dish with the lids of the peppers on top. Mix the sauce together and pour into the bottom of the dish surrounding the peppers. Bake for 40 minutes. Remove from the oven and remove the tops off the peppers. Divide the shredded cheese among the peppers and top each pepper...it will be a lot and fun!!! Re-top the peppers and place back in the oven for 20 more minutes. When done, I spooned some of the sauce on the plate and set the pepper on top. Served apple sauteed spinach with these and it was fabulous. 

Did I mention I also made mine in about half the time the original recipe called for?!
Guess I better not share that too much...lol...
Btw, try the Kraft fat-free cheese and let me know what you think.
They melt too! Imagine that...I look forward to make my own on our farm...
Enjoy!!!
Hugs, Rita 
Tuesday, January 22, 2013 | By: Rita Hutcheson-Cobbs

Gluten-Free Blueberry Apple Skillet Pancake with Recipe

 It has become an obsession with me! I wake up thinking about it. I go to bed planning it. I make my list standing looking at it. I thumb through books about it. I surf the internet about it. I have even turned on the television to watch programs about it AND that is a huge deal for me to have time to do! FOOD! I have fallen in love with cooking! I love making healthy fun foods for my family, like this wonderful skillet meal made in my wonderful iron skillet with my home grown blueberries while adding gluten-free waffle mix and fresh apples and other wonderful ingredients. I know, I know, I know what went into this fabulous skillet AND part of it went in the freezer for a few days later...

My teaser photo for Facebook, "Wonder what these will make for breakfast?"

Then I kept right on posting, even on twitter lol...

The whole dish was amazing and didn't even stick...

Baked evenly, light and fluffy...

Added maple syrup and blueberries to the top...yummmm!
Now for the recipe...

Gluten-Free Blueberry Apple Skillet Pancake

1 16oz box of Hodgson Mill Pancake & Waffle Mix, Gluten-Free
1 teaspoon real vanilla extract (I use homemade)
4 Gala Apples, diced finely
2 cups frozen blueberries, thawed, drained
5 tablespoons Splenda brown sugar
1 teaspoon cinnamon

Preheat oven to 425 degrees. Spray an iron skillet generously with cooking spray and place it in the oven to warm as you prepare the pancake. Prepare the pancake mix as directed on the box, **BUT instead of adding oil, replace it with melted real butter. If you use a packed mix that doesn't call for butter, add 2 tablespoons of melted real butter to the batter. Mix in the vanilla, brown sugar (reserving 2 tablespoon to sprinkle on the top), and cinnamon. Fold in the apples (reserve 1/4 cup to sprinkle on the top) and blueberries (hold back a few if someone wants them to top their served portion). Then pour into the iron skillet. Mix reserve applies and brown sugar in a small bowl and sprinkle over the top of the mixture. Bake for 1 hour (60 minutes) until a sharp knife inserted in center comes out clean. Serve with maple syrup, which I sit in a pan of water warming on the stove on low while the pancake bakes. Yummy... Then have some blueberries to top the pancakes as they go on the plate if you like. Lovely. One of my son's likes whip topping as well. There are so much fun to make as individual pancakes too. Rockin' Awesome Recipe...Enjoy.

Hugs, Rita
*Markets in my area that have the mix from this recipe are WalMart, Publix, Foodland...

Monday, January 21, 2013 | By: Rita Hutcheson-Cobbs

Recycling the "edge" of a Scrapbooking Page...

 When I attend retreats or crops, someone might put papers out that they no longer need or wish to swap for something else. I will find a sheet that has an "edge" to it. The paper will still be 12x12 or whatever the design element might be but has the advertising strip along the edge. Sometimes the edge is double-sided and them sometimes, it is one-sided, if it is one-sided, you can do this easy recycling project. If not, paint it and still recycle it. =) I took the 12x12 sheet to my paper cutter and cut the edge off. Then I turned it over to the plain white side. I distressed it with each of the ink spots shown in the photograph and after each color I rubbed the piece of trim down with a makeup sponge, my go to for doing this type of work. Why? Readily available, cheap and works great! You can put a "clamp" paper clip on the end if you don't want to get your hands messy! =) Then...

You have this...which can be used...

Here...loving it...
Recycle-Reuse-Recreate...

Hugs, Rita