Wednesday, January 20, 2010 | By: Rita Hutcheson-Cobbs

Trying to find my paper artist style...

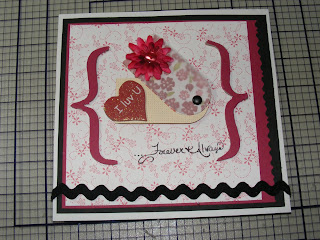
I have been playing with various styles of paper, embellishments, and techniques in search of what my paper art style might be. I don't think it is romantic or even as "precious" as the card in the photo above illustrates. I like the vintage but find the darker colors less soothing or encouraging. Bright colors are interesting to work with but the apeal of contemporary is something I might enjoy as well. In the meantime, I will keep playing with medias until I find it. Working with beads, it is easy to define my style, but with quilting I go toward the Civil War patterns and fabric. With wood, I like the darker finish while with yarn, I would rather work with soft "for baby" fibers. In needlepoint, I love the country look, but in paints it is hot pink, chocolate brown, and black. So, what all of this reveals to me, is a mixed up media artist. =)

Sometimes it take experimenting to find our best. The harder we work, the more growth and defined we become. Maybe, just maybe, in all of this,  I will find the respite in paper arts that I am looking for. Therefore, I will press down harder, as the rain outside my window, to wash out the clutter and find what works best for me and what I will enjoy playing with.

Love and Blessings, 
Rita
Monday, January 18, 2010 | By: Rita Hutcheson-Cobbs

Making cards, Crockpot BBQ Chicken & Quicky Cole Slaw Recipes...

I love the little people stamp collection from Stampin' Up! They are so much fun to use in many different projects. Cards are my specialty but I am learning to make mini-scrapbook albums. Just today, I picked up some wonderful scrapbooking items at Big Lots.  Imagine that? Big Lots has a whole section dedicated to scrapbooking items. I can't wait to video my haul, I believe YouTube videographers call it. (Love that big word!)

Paper arts and crafts are indeed fun. There are no limits, no rules, nothing coming between you and paper. You can use recycled items, make your own paper, or even create pages with magazine sheets and paint. The world is your canvas and paper is your media for getting there. I love to make my own paper but time limits my abilities at the moment (I am caregiver for my mother and son...not to mention the Alabama weather is very unfavorable this time of year for someone working outside).

When I am working, simple meals are also great. I can start something in the morning and have the table set by 6 pm each evening. It doesn't always work that way but eating at home saves us time, money and energy, plus it gives me a few more minutes in my studio. I will give you some simple recipes here so that you can try them at home...

CrockPot BBQ Chicken...

Take 6-8 (six-eight) frozen boneless skinless chicken breasts and place them in a CrockPot that has been sprayed with cooking spray (I like the ones made with olive oil). Then pour a 16 oz BBQ sauce over all the chicken. Put the lid on the CrockPot and allow to cook on low for 6 (six) hours. Ready to serve and really really good. This is a Rita original recipe too!!!

I love to read cookbooks but using them to make a meal isn't my favorite hobby to do. Now for the side dish...

Rita's Quick Coleslaw

1 super large head of green cabbage, chopped or shredded (do it yourself or buy the bagged kind)
1/2 a large onion, chopped (also you can buy this already done at the grocer)
2 carrots, shredded (again...well you know what you can do...I use the whole carrot minus the top/greens)
1 Tablespoon of freshly ground pepper (nothing better than fresh ground)
1 teaspoon of fresh ground salt (yes, indeed...I love the flavored salts too)
1 Tablespoon of celery seed (I buy this crushed at the Dutch Oven near Cullman Alabama)
1/2 cup apple cider vinegar + 1 Tablespoon cold water
1 cup of mayo (I like the Kraft with Olive Oil...it is the best ever mayo)
2 Tablespoons of sugar (more or less, whatever to taste)

Mix the veggies together in a bowl by tossing them a few times. Then mix all the remaining ingredients in a separate bowl until well blended and then add to slaw. You may need a little extra mayo, salt or sugar...just dash some right on into the slaw. Serve chilled. (I may not like to cook but I can certainly through some things together that will make you wish I did!)

All you need to add to this meal is a bowl of sliced apples or a few pineapple rings. Done! This is a wonderful meal and cost is less than $15 to make....our family has 6 people in it and we have a plate left over for the next day...pretty good I would say.

Enjoy and have a great Paper Artsy Day!!!

Love and blessings,
Rita

Thursday, January 14, 2010 | By: Rita Hutcheson-Cobbs

Making a Little Notebook by Recycling...

Last night, I watched several YouTube tutorials on how to make mini-notebooks. The ones using recycled items really appealed to me. I pulled one of my coffee collars (love that title used these…from the movie “Made of Honor” which is one of my favorite movies). Thinking of Valentine’s Day next month, I picked embellishments with that in mind.


I took the coffee collar and cut it on each side. This was easiest to do since the fold was already there. Then I traced my patterned paper which was scrap from another project and also traced the coffee collar as a template for the paper that will go inside which was on scrap cardstock as well.


Then I used Versamark and stamped the inside of each portion of the coffee collar. Then I added gold embossing to the inside. I had just got my gold embossing powder and thought it would compliment the paper and the cardboard of the coffee collar. I loved the results.


I placed the patterned paper to the front of the coffee collar. Then I used my 3/16 to punch holes on the end. After cutting out by hand each white page going inside, I punched holes in those also.


The flower of pink and off white accented the patterned paper. Also, I added the chipboard “Love” to the front which already had glitter and painted red. Plus, two hearts which I layered. Then on all these elements except the flower, I added Crystal Effects to make them shine and pop. As you can tell, I am addicted to the “pop” and “shine” of any embellishment.


This project took about 30 minutes to do, but I let the Crystal Effects dry completely before I put the mini-notebook together.

Love and; Blessings,
Rita
Wednesday, January 13, 2010 | By: Rita Hutcheson-Cobbs

My 1st Mini Scrapbook Album "Beary Day"

I have fallen in love with Mini Scrapbook Albums! Having 29 years worth of photos to scrapbook has made me feel very overwhelmed. So when I started viewing various videos on YouTube, I soaked up various details and learned each and every technique used. On this album, I used many of them, imperfectly, but with practice, I feel confident.  The most important thing I feel about Mini Scrapbook Albums is that I feel the freedom of creativity. Photos I have came to mind as I created each page. Maybe with mini albums, I will get all those photos put into albums. ((Smile))

This is the front cover of the Mini Scrapbook Album titled "Beary Day"!

The Build-a-Bear is from the Stampin' Up! Sizzix Collection. I made the grass & tree trunk by hand, highlighting the tree trunk with Chocolate Chil SU ink.  The tree green is made using Creative Memories cutting system, circle.  I used the SU heart punch to do the hearts with the idea of "Picking Hearts" instead of Picking Apples. =)  I plan to add some bling to the ribbon using beads and a bear charm.

The cover...this album is 5x5 for the most part...the tree is obviously larger.

Pages 1-2

This page is for journaling or to add a photo. I used SU Chocolate Chip ink to highlight the edges of the flower, which has a cute pearl in the middle. I used the Binderie to add the metal record binder at the top. Then I added scrap paper and ribbon to the bottom of the page. I stessed the edges of the scrap paper using sandpaper. The crackle paper is so perfect for this album, but I only had one sheet and not sure where it came from.

Page #3, was so much fun! I have ordered larger letter stickers for future albums, but this worked for this page. "Have a Beary Day!"  The board border is scrap from a coffee collar I got from Starbucks on my last Chai-Latte. =) The butterfly was made from a Sizzix die cut. I layered it and supported each portion with foam raised dots (not sure what the actual name for them are).  The hart diecut at the top, I accented the heart with Crystal Effects twice. It has a shiny raised appearance. Then I added a tag for a photo or journaling.

Pages 3-4 were my last pages to make & were very very creative.  I took Crystal Effects and made several of the insects and butterflies stand out, shiny.  Then I added the window view using white cardstock and raised foam adhesive squares.  Finally, I didn't have fabric onhand so I used toilet tissue paper with flowery design & scalloped the edges. I think I will get a cat diecut or sticker for the window too!

Pages 5-6.

This page was fun too! I made a pocket using a template I got at a card camp, added patterend paper to the front. On that patterned paper I used Crystal Effects on several of the butterflies to make them pop and shine. Then I added tags for accents.

I added tags, as I mentioned, I used a rubber stamp to add the bird, flower, & message then placed a ribbon through a center hole for embellishment. The smaller tag has patterned scrap paper and I used a tag punch to make the little white journaling spot. Bling was added to the smaller tag and the corner of the page. The pocket has small window cut outs at the edges so you can see the paper through the pocket. I thought that was adorable.

This is the backside of the tags. I added a flower stamp to the corner of the green tag. Also, I used an office clip to hold the smaller tag to the page pocket. The ribbon on the smaller tag is attached with a mini safety pin.
Pages 7-8

I took the paper matching the next page as my focal point under the stressed out layered paper. I tore the edges and curled the edges by rolling them up on a pencil. There is a surprise in the middle that has a cute pink flower on top.

Surprise!! Two journaling or photo spots are inside of the little album, 
but...there is more...


I added three more journaling/photo spots to this little album. The first page, to the right, has a cut paw print, to go with the bear theme of this album. I made this tag by putting three strips of double sided tape on my pattern paper, then took emossing clean powder and my Versamark pad, creating a texture element. Then I added my paw die cut to the top and cut it out adding framing to the piece. Totally cute and shiny. The tag is made with torn scraps of paper and a message rub-on. I added clear embossing to it also. Creative, don't you think! =)

Another Build-a-Bear diecut was added here with a cute little outfit that was accented with colorful brads I had leftover from a card project. I added canvas ribbon tto the bottom as a floor background. Then I added a card with a flower brad to make it pop. The gift bag in her hand is a stamp from the Build-a-Bear collection. I used a marker to color in the nose & add stitching to the layout.

Pages 9-10, I think...LOL, losing count...

THis is a pretty simple page, I put a scallop to the edges of the focal paper. Then tore & stressed the edges, rolling them up and adding it to the focal paper. Then I took 3 tags and placed them inside a bright colored ribbon. Cozy...

I actually did these tags in the beginning of this project. I thougth I did very well with my embossing! I added ribbon to the tags. I made the tags with a rubber stamp from Stampology. I added colorful paper to the back of each tag also.

This page was made basically as the one prior. I added a flower accent at the bottom which I added Crystal Effects to so that the little flowers would shine. Then I added a yellow/orange flower to pick up the colors in the tiny accent & the embossed tags on the previous page. Then there is a removable embossed tag with a red ribbon added to it tucked behind the flower...it is removable with patterned paper on the back.

Pages 11-12 are coloring pages. I will add crayons to each page tied with a ribbon. I thought simple...

 
Final pages of the book with cute surprises inside. =)

This page was so much fun. I took the focal paper, matching the next page, and placed it on bottom. Then tore scrap paper for the accent elements. The word "delight" was a cardstock diecut that I added 3 coats of the Crystal Elements to so that it would totally pop and shine! Then the paw print is a repeat process I have already used on this project. Here the embossed portions of it really shine. I like that. =)

The framed paw print folds open to a mini-mini album for photos or add scrap paper for journaling.

Opps...forgot a page in the mini-mini album. =O

Here I added more photo/journaling pages...I stressd the edges of each one too.

I loved making this page. It s a bed, with a blanket on top. I added the raised foam adhesive to the comforter where it is folded down and under the pillow behind the bear with adhesive tape on the edges. It look fluffy.

I didn't show that the bear slides out of the bed. =( However, inside the blanket is a pocket that holds two more tags for journaling or photos. I added ribbon to the edge secured with a tiny safety pin.

Here are the back of each tag. I also used a brown and black marker to highlight the bears features. At the end of a Beary Day, one can rest assured that it has been a fun adventurous day. =)

I added a note to the back that I made this and when. I also added a pocket for one last tag that is covered on both sides with scrap paper. I also added the final paw tag I made throughout this album. I loved the crackel paint paper...I must find more...
I hope you have enjoyed this presentation. Be sure to check my YouTube page, www.youtube.com/RitaHutchesonCobbs for my first video showing this album. =)

Love and Blessings,
Rita and... Have a Beary Day!
Tuesday, January 12, 2010 | By: Rita Hutcheson-Cobbs

The rewards of scrapbook challenges...

. Kay from Toodles & Binks: Rose Tapestry Stamp
I won this stamp in The {Scrap} Beach online January Crop this past weekend! WOOT!!!
Can't wait to make something with this beautiful stamp...
Check out my layout photos on my blog...
Love and Blessings,
Rita
Sunday, January 10, 2010 | By: Rita Hutcheson-Cobbs

The {Scrap} Beach January Crop Challenge Picture Show!


Challenge #1 using no black, white, or grey! Whew wee...brown was it then...I love the Build-a-Bear series of die cuts. I made this little bear at a card camp and he fit perfectly on this layout. I loved the torn distressted edges of this paper. This was a fun technique that I learned from The {Scrap} Beach  tutorials.


Challenge #2 was to use no ink, except a black journaling pen. I thought this would be a cute gift to my husband for Valentine's Day. He was so sweet to set me up a table and bring in my small supply of scrapbooking items due to the severe cold at this time, my studio wasn't a place to be and personally, beads were to cold to play with, so this was a wonderful respite to the winter days.


Challenge #3 was to do a layout titled Family.  I love my family and this challenged me completely. New to scrapbooking techniques like this one, I wanted a henge on my little journaling pocket. So, I got one from the shop and my husband cut off the tips of the screws so that it looked real. Glue works wonders and the pocket opens and closes. I have a journaling note inside and a tab saying how this family is...like we would forget. =)  The paper I used crystal effects on some of the flying insects to make them pop and shine, a new technique for me for sure!


Challenge #4 using a technique (or 2) that may be too hard or too difficult....OMGosh!! This layout has several scrapbooking techniques that I have never used before and may never do again! LOL. The chipboard letters for the word love, I first covered in paper, distressed and inked the edges. They still seemed plain to me so I added clear embossing powder to each of them. I added my husband's photo (of him at his favorite store, Habitat Store) and then a photo of us inside the letter E to which I added crystal effects to as well making it look like a glass covering. The pocket was from a templete of a library card pocket (remember those??) I had in a recylced book. The tags inside hold some other techniques I figured out for myself that I will share at another time. It was fun, this whole page was awful messy!!!


Challenge #5 was to make a page related to high school, college or grad school.  Enough said. I did high school because that seemed simple enough. I added tabs for 4 different areas of high school for me, my favorite of course was friends.


Challenge #6 was to share what going to the BEACH meant for me. Personally, there isn't enough paper to express what it has meant to me. I found this group through YouTube videos of "Kathryn" who created this group for scrapbookers. It is wonderful. I have learned so much which has created comfort for me with scrapbooking. My calling will be mini-albums...not scrapbooking the 29 yrs worth of photos I have...at last not yet.


Challenge #7 Invest Wisely was the them for this one. I love the vintage look of this one, especially working with elements I had never tried before. The butterfly I used on another page, but I did this butterfly first when I was tyring to figure out where to begin all of this. The tool for me, since I obviously don't have a lot of scrapbooking tools, was my woodburner. I made this little tokens using it and added the crystal effects, which is my favorite product thus far.

This has been my show and tell for my first Online Live Crop!  I worked through 7 am this morning and finished my pages today PLUS starting my first mini-album. I am soooo excited and thakful that these wonderful people have come into my life to mentor me and lead me as I begin making mini-scrapbooking albums.

Love and Blessings,
Rita
Friday, January 8, 2010 | By: Rita Hutcheson-Cobbs

Scrapbooking: Where to start!


I love paper crafts! Making cards is one of my favorite ways to demonstrate my love for paper. However, as I watched various videos on YouTube, I ran across several demonstrating mini scrapbook albums. I have made only three scrapbook full albums in my life…so my experience is limited and I simply got overwhelmed with all the photos I had that needed scrapbooking that I simply quit.

My first album was of a collection of school photos for a music teacher my son's had while in school. He had left a private teaching job for a local university position. The school contracted with me (as a graphic designer) to work with their yearbook annual. As I was cleaning out years of stored photos, I found many of this teacher's photographs and former students. I got the idea to create a scrapbook. There was no such animal as a scrapbook store or specialty shops to buy items to create an album, even online. So, I went to a department store craft section. I stood in an area that had scrapbook things, but was confused. So I asked a few people that came through asking them for advice. In the end, I had a great album but boy was it heavy! I had 12x12 designer paper for every single page and loads of embellishments. I had some of the students write my husband notes on their photos and even a CD of music the choirs had recorded. Beautiful, but I see now that I could have done much of it very different.

The second and third albums I created were over a weekend retreat several years ago. I took my son’s eleven years, birthing him all over again and carried him to just beyond hi eleventh birthday. It was fun, I met the challenges of completing the most pages, but I didn’t sleep the whole time…I worked, that is what I went there to do. However, my excitement wore out in the end. I never scrapbooked another thing.

Which leads me to now. I loved the mini-albums that each video on YouTube created. I thought, “This is something I can do and would love every moment of!” I thought of all the people I could make gifts for, especially the nursing home residents I have befriended. I watched, listened, took notes of items I would need, basics to get started. I love the chip board mini albums so I began there. I found various things online and ordered them.

Then I came across and online group that holds online live chat rooms for just this purpose…to talk about handmade cards and mini albums. I feel in love with a new aspect of paper arts. With advice I gained from these gals, I was able to stop my studio with products I would need. I can add photos or I don’t have to add photos…I have choices. I can create, paint, embellish, cut, fold, whatever my creative inspiration creates within me, I can do.

I am sooooo excited about this! I may ask one too many questions, but I am learning about tools and everything related to creating mini albums. So, Saturday night from 8 pm to 2 am my time, I will be online, creating. I just love technology!!!

Love and Blessings,
Rita