Sunday, April 18, 2010 | By: Rita Hutcheson-Cobbs

Recycling Dryer Sheet into Flowers with a Beautiful Twist...using Sizzix Dies...


I wanted to share with you my latest creation!!! I watched my friend Amy's video on her YouTube channel making lollipop flowers using dryer sheets.  I made one and then I thought why not use my Sizzix Flower Diecuts and the BigShot to make some...it totally worked with amazing results!! They are so pretty!!!!  I will have a tutorial of how I made these flowers on YouTube by Monday evening, April 19th.


This flower is using single layers of the smaller diecut sheets, adding some mesh (not sure what it is really called) and a white feather. This could be worn as a pin or a hairbow. .


After making the lollipop flower for the mini album I was making, I decided to add the flower on the right. The buttons screamed the mini album theme and I had to use it. I have three buttons on this flower.


This flower has a vintage button in the center and this photo doesn't do it justice! Beautiful!!


This button came from one of TSB Babes and is just classy.

I hope you enjoyed seeing these flowers. They took me less than an hour to make, were easy to do and although recycled, they smell great and are durable but light weight. You will love how they look. 

Love, Blessings, and {{{Hugs}}},
RHC
Friday, April 2, 2010 | By: Rita Hutcheson-Cobbs

My First Layout for the ScrappyAccents Design Team...

This was a fun layout to create; however, it may be the only traditional scrapbooking you may see from me. =) Then again, you will have to join Scrappy Accents to find out. LOL. Also, I have some videos to edit and upload to YouTube and one includes another recycled object. For now, I would like to wish all of you, from my family to yours, a wonderful Happy Easter Celebration! May God richly bless you and keep you.

Love, Blessings, and {{{Hugs}}},
RHC
Thursday, April 1, 2010 | By: Rita Hutcheson-Cobbs

My first Design Team Opportunity, A March Reflection, & Looking into April...

I am very excited to be a part of my first ever Design Team Opportunity!!!
The month of March has been truly an exciting ride. I uploaded my first Paper Arts videos to my YouTube channel, discovered recycling damaged books into works of art by recreating them into usable mini albums is a way to reuse an item, decoupaged for the first time using not only paper, tissue paper, but also metal, wood, chain, buttons and more, and learned amazing recipes including making a cake in the CrockPot so that I could continue working all day without worrying what I will prepare for my family for dinner. LOL, it has been a wonderful whirlwind ride this past month.

There is NO April's Fools about what this new month will hold. I am very excited to look into Ustreaming projects on a weekly basis as well as a PodCast bringing awareness of the world of art to the world. All this may float into the next month, but it will happen. I dream about ways to bring paper art as well as beading, yarn, wood, and fabric to others. I love it!!!! Also, our family will be celebrating the month of April for the birth of our son, Joel. He will be 21 years-old on the 28th!!! So, world, beware...he is officially going to be an adult who is totally ready to discover the world of writing. (Check out his movie reviews by following the link within the right margin of my blog). 

Finally, Friday is Autism Awareness Day so in honor of our son, Garrett, please wear your favorite pair of blue jeans and a red shirt (or an Alabama sports shirt)!!!! Woot!

So, keep watching, convo'ing, and showing your creations for that is the inspiration each of us live for.

Love, Blessings, & {{{Hugs}}},
Rita
Tuesday, March 30, 2010 | By: Rita Hutcheson-Cobbs
Sunday, March 21, 2010 | By: Rita Hutcheson-Cobbs

Pop-Up House Mini Album with Directions, Patterns, & How it came to be...


Thank you so much for checking out this adorable album I made by using an actual children's book as a template. If you have any questions regarding the directions or measurements, please feel free to contact me. The meteric measurements are available using a converter calculator found on Google Search. I will plan to add them in future templates.


This is the Pop-up House Book that I created. The cover, front and back, is from a recyled book cover that I decoupaged following Jann at WhatYouMakeIt1's YouTube Channel. You can watch the details of the book and the directions in upcoming videos on my YouTube Channel.

This is the book that I had planned to take a part and use it since I only paid $.20 for it at a thrift store, but once I saw what in great shap it was in...I decided to copy and donate the book to Children's Rehabilitation Service (follow the link in the right margin for more information).

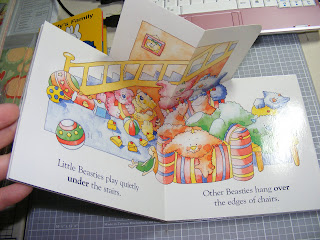
This book also has a surprise element that I incorporated into my own mini scrapbook album...it is a pop up book and each page section has a different shaped pop up...that is what I also added to my mini album. =)

This is the template for the pages that go inside the book. Cut on the fold of your paper. Cut one for each page section of your book.

This is the template for the pop up portion of the mini album. Cut one for each page section of your book.

The template cut out. The dashes are the fold line for the pop up book. The triangles are the bottom of the page are the supports for the pop up of your book.

I used a hole punch to make a marker point so that I could easily fold the pop up supports without making the fold line on my paper.

This is my envelope measurements for the envelope. I didn't measure and mark all my envelopes, I simply added them to the back of the pages and cut the top off usinig the page edge as my guide. However, to make my first envelopes the measurements helped tremendously.

Although I recycled a book cover for my mini album, I still cut it a little larger than my actual book. So, if you wish to make your album using chipboard, then cut it a little larger than your page. I also cut the cover to my mini after I put the pages together.

The envelopes are added to the backside of each page section using double sided adhesive.
However, see the next photo to understand why I would add the pop up section before the envelopes. I apologize for not doing so in this guide.

I found that if I had added the pop up portion before putting the envelopes down, I wouldn't have had the edges of the pop up supports catching on the tags inserted from the sides. Keep following the directions and this should make sense.

At this point, I used my decorative scissors to create the desired edging for the pop up I wanted to create for this page section.

Add the double sided tape to the top, inside edge, and the bottom. Leave the page outside edge without tape because you will create an additional slot for a tag by leaving it open. Then you will attach the envelop with the next page and continue to the end. The last two pages will look like this and will be added to the inside of the front cover and the back cover. On mine you will see on the video that I added a pocket to the front and back. I plan to open mine into a circle to display for our open house when our forever remodeling/building is completed on our house.

On this project I used the be loved paper kit by My Mine's Eye...


I should have the YouTube video posted by Monday morning...
Thank you!! Please contact me if you have any question regarding this album.
Love, Blessings, &{{{Hugs}}},
Rita
Sunday, March 14, 2010 | By: Rita Hutcheson-Cobbs

TSB March 2010 Crop Challenge Entries

Welcome to the TSB 80s Theme Crop Party...
The ultimate online cropping event with the following challenges...

Rainbow Bright using primary colors red, orange, green, blue, violet with white, grey, & black...
This layout contains one of my favorite elements of nature, butterflies, and several elements of embellishments. The border is three strips in white, grey, and black with a flower punch runner on the inside using a Martha Stewart punch. Then I took the letter b in chipboard and added hearts from the sizzix butterfly diecut to line the letter. The butterflies are from the same diecut, Glimmer Misted with Marshmallow. The red of the challenge is in the paper along with green and violet. Then I finished the design with bling and brushing the butterflies and the letter with Mod Podge Gloss-Lustre. The brightness of this design just made me smile. =)

Stamp with Bleach

This was indeed a challenge for me since I am highly allergic to bleach. I wanted to add a photo for Kathryn, our host who is totally the most. LOL. However, my husband offered to help since he was more concerned with a trip to the hospital. =)  In this layout, I took the green cardstock and stamped bleach image and run it through the Big Shot using the Top Note Diecut. Then I attached it to the yellow paper and used the flower punch from Martha Stewart then added an envelope to the back, creating a pocket. The tag is double sided and distressed with Tim Hotlz Walnut Stain and fibers added to the end. The feather and the silver buttons add a completed touch to this page. Also, I Glimmer Misted the backgroun paper with Graphite.

Transformers

I loved making this page the most I think of all the challenges. I took the grey background and glimmer misted it with Graphite and then used the Medallion stamp from Stampin Up and black embossing powder to create the design. Then I made a pocket using a black piece of cardstock with a gold embossed Medallion stamped on the edge. The tags were made with the same papers and topped with a crown diecut to each side attached with a glue dot. Then I topped off the page with both silver/gold bling. This page totally pops!! =)

About Eating

All I could think about was the macaroni & cheese paper I have had forever! I don't remember where or when I bought it but knowing that my sons loved Rachel Ray's recipe for homemade macaroni cheese! I first placed the imaged paper on the bottom then added the black trimmed border, again, using the Martha Stewart flower punch, at the top and bottom of the page. The black bird, leaves, and swirls are images on top of a acetate page that I secured to the mini page with fibers that I ran on the side and secured to the back. This was stepping outside the box for me even though it is a simple page. I loved the results.

Using Crumpled/Scrunchy Paper

All I could think of was flowers and then I drifted to thinking of how forward I am looking to the spring time of the year which led to thoughts of gardening. =) Therefore, I picked the theme Seed, for by this we are creating through nature our complete existence in this life's path.

Pretty in Pink

OMGosh...I totally love pink, but...whew wee, this was enough to put me over the edge. ((Just kidding))  I got the ribbon diecut from Sizzix while it was on their clearance list so that I could make ribbons in purple for seizure awareness since we have two sons with seizures. However, it came as a set with a large ribbon diecut and a small diecut then an embossing templet too. I used them on this page. I have no idea where I got this large flower but it fit perfectly for this page. I took the green leaf off and used it on the "Seed" layout since I could only use pink for this challenge. I added a ribbon emblishment and a pink paper clip to the page as well. This was so much fun!!

I really enjoy the monthly crops with TSB and Kathryn. It is a respite from my busy life of being a wife, mother and caregiver. God blessed the day this group came into my life and I have explored and created elements that fit my personality and certainly push me out of my comfort zone and creative box. I love that the most and I see that I am a stronger artist as a result.

Love, Blessings, and {{{Hugs}}},
Rita

Tuesday, March 9, 2010 | By: Rita Hutcheson-Cobbs

Something Blue in Creativity and in Emotion

"Something Blue" for my swap partner Micki!!

Marriage is an awesome union of reflection, romance, renewal, and rewards, but it helps if love is part of the total picture even though over time it won’t sustain a couple unless there is much more. Time builds the relationship into one.  So making a mini-scrapbook album for my partner Micki wasn’t a chore at all. When she mentioned her son was getting married, I thought of “Something Blue” as my theme. Then my imagination just flowed.

Since December, I have battled every aspect of the cold season. Medication wasn’t working because my body had built a resistance to them. Then my doctor gave me a different medication that seems to be working well just in time for my asthma to kick in. However, I haven’t let these become excuses in my work. I simply put my calendar and journal beside me, sewn to the hip, if you will, and as the ideas came, I wrote about them, drew various ideas and marked my calendar with work order of ideas for each day.

I thought about this and as an artist, I find inspiration in so many different places that I need to make my calendar and journal a very important part of my identity. So, I add clips of fabric, patterned paper that I have enjoyed working with and notes throughout. God has opened my eyes to so many possibilities and resources to use in my work.

So, my challenge to you is this….keep a tablet (journal) and a calendar for one month. Write, draw, regardless of the possibility your idea could come to pass, clip news and magazine articles, etc and place them in your tablet. Then at the month’s end, write me about it, send me photos and links to your videos. I can’t wait for God to open up the opportunity for creativity in YOUR life….There are so many treasured elements that will spring from something so simple as a mini-scrapbook album. =)


This is a charm I inlcuded inside the "Something Blue" mini-album. I used a charm and added a piece of hymnal music, added some blue string, and a clip of the paper I used in the album. She can add this charm to her holiday Christmas tree, hang from her Bridal Bible or to leave inside the album as an added element.

This is the "Something Blue Bracelet" I added to the mini album for the bride to wear if she liked to reflect the old adage "Something Blue, something old, something new..." I made this will glass beads, blue pearl beads and a glass charm. Then I added a sterling silver heart shaped toggle for the closure. It is light weight and very pretty. I crossed the mediums with my paper and beading arts and love every moment of it!

The oval element with rhinestons and pink pearls is from an earring that I had in my recycle stash. I just cut the backing off the earring and added it to the Tim Holtz swival chain. Perfect touch for "Something SOOOOO Blue!"

Love, Blessings, and {{{Hugs}}},
Rita
Thursday, March 4, 2010 | By: Rita Hutcheson-Cobbs

Rubber Stamped Quilted Wall Hangings....

"Ol' Blue" Wall Hanging

"Daisy" Wall Hanging

This past weekend was an amzing time of creativity.  I wanted to incorporate a couple of the mediums that I enjoy working with into one project I was very pleased with my first attempt but was very excited by the time I finished the second. In "Daisy" I have added rubber stamping, sewing, quilting, fabric, Glimmer Mist, and recycling old wash cloths and towels. In "Ol' Blue" I followed the same outline of mediums but added Stickles to the stamped images. Photography just doesn't do justice on either wall handing. The glitter element is so beautiful! I hope you enjoy these two productions from my studio.  Looking forward to a beautiful weekend.

Love, Blessings, and {{{Hugs}}},
Rita
Tuesday, February 23, 2010 | By: Rita Hutcheson-Cobbs

Need Closure Ideas!!!


Check out the crochet pieces...here...and below. 


I wanted to add the tubes to the ends or wrapped wire, however, I want something different. Give me some ideas on how to finish these necklaces... I can't wait to hear your ideas... Thanks so much, Rita

Sunday, February 14, 2010 | By: Rita Hutcheson-Cobbs

She said it just right, "Bless it's little Pentium's heart!"

My Valentine's Day gift from my son, Ethan...totally Handmade! Loving it...

“Someone asked me this morning, why do you spend time blogging online when you could just write in a journal or something?” That was quickly followed with, “Aren’t you afraid to share so much on the internet?” I just smile and say, “Are you online?” Most of the time, I find that the person has never tried social networks or blogging online or they will make excuses for not bothering with it. However, once they hear my reasons for blogging, spending time in artist chat rooms or dropping artist tips or updating my status really creates bonding relationships while building your business (on many levels), they rethink their prior observation and become inspired to at least try the world wide web.

For me, building the relationships with individuals is most important to me. As the caregiver for my father the year before he passed and now my mother and sons, I have to be available to my family 24/7 which means I may not be able to leave the house. So in the comfort of my home, I can share a meal with someone in The Netherlands or create a piece of art while sharing conversation during an online live chat. We discuss art, our work, what we are having for supper to our family. I feel connected to people outside my circle of reality.

Another benefit is what I have learned from the process of creating social networks and blogging. I have my Twitter connected to update my Facebook, social network chat rooms, blog and website all at the same time! That rocks!! With one click of the “enter” tab I can post my status, the latest artist tip I wish to share and what I am working on at that moment. I am not a technological person; I have never cared how to know something works, just as long as it does. With my trusty pink notebook laptop, I have created the most amazing network within technology just by getting online, putting aside my fear and plunging forward.

Besides, the character Dolly (played by Stockard Channing) in Must Love Dogs said it best, “Where can you pay your bills naked? This little baby works for me 24/7, bless it’s little Pentium’s heart!” There is simply no other way to describe the internet. Used wisely, maybe better fully clothed lol, one can build friendships, their business and pay their bills without leaving home; however, one can also escape the reality of home to share time with others like minded in interest or business.

Indeed, I love the blogging opportunities before us. Try it...
Love, blessings, and {{Hugs}},
Rita
Thursday, February 11, 2010 | By: Rita Hutcheson-Cobbs

My "CrockPot" Version of Managing Monthly Financial Receipts....

Photography by Rita Hutcheson-Cobbs

Don't let $$$ give you the chills...=)

“Argh! How do I keep all these receipts organized??” My friend said to me during a phone conversation. I could sense her frustration and concern. She owns her own business and has all the paperwork for her family as well. She was getting overwhelmed preparing for tax season. Although I couldn’t help her in anyway for last year’s paperwork, I could certainly help her this year and in the future to make things easier.

Before I share with you my technique for managing our paperwork within our home and our businesses, these are the items you will need:

12 – 10x13” Envelopes with clasps
Excel Software (which if you have Microsoft, you have Excel on your computer…you don’t need to even know how to use it either)
Printer
Scissors or a paper shredder
Online access to your bank account (everyone should have this already…paperless is not only secure but you are saving trees)
Pencil

Directions to begin…
***Schedule a day each week to do this. I do mine the last day of the month because I have been doing this type of organization for a while.
1) Before you panic, let me say that Excel isn’t hard to use at all. There are many YouTube videos on using this tool and if needed, I will be happy to do a tutorial on using it for this specific task. (Just leave me a comment requesting a visual.)
2) Organize your receipts – for gas, utilities, groceries, etc – into months. Since we are only into the second month of the year, this shouldn’t be very hard to do. Then organize them by date.
3) In the top left corner, write the month on each of the 12 envelopes, January through December, and the year, 2010.
4) Working with one receipt at a time, write it into your checkbook register, put it on Excel Spreadsheet (which I will explain in a moment), and check your online bank account to make sure the amount was correctly was posted. Some receipts may not have cleared if you had just spent that money this morning.
5) Using an online Excel Spreadsheet is wonderful when organizing lists or receipts. I am not an expert with Excel, but I know it works well. At the top, beginning with the first block to the left and each block across, add these headings: Date, To, Amount, Reasoning, & Miles. With “Date” put in the date of each receipt. “To” is where your spent the money. “Amount” is the total cost of the receipt (if you have 2 items out of 10 that you need for taxes, then take those 2 items, add them together plus the amount of tax for the area you made that purchase and put that amount into this space). “Reasoning” can be a definition for the amount or that it was a prescription, whatever will help you remember where this amount needs to be applied for taxes. “Miles” is how far you had to drive to do this item because mileage can be a tax deduction. (****I have just decided to do a video of this…so check out YouTube in the next few days!****)
6) On the receipt, once it is entered, place a check at the top indicating that you have put this in your check book. Then add an “E” to indicate you have entered it into Excel.
7) Place the receipts and bill stubs into the envelope for that month.
8) At the end of the month, simply print the Excel sheet for that month and place it inside the large envelope with your receipts and you are done.

Now some tips that work for me. If I stop and get gas, then I take that receipt, verify that amount on my online banking statement, then I shred it or if you don't have a shredder, cut them into tiny strips before throwing away. I do the same thing for snack recipes and eating out that do not apply to our businesses. NOW sometimes, I meet clients at restaurants or for coffee; I take that receipt and treat it as I would business supply purchases. I enter it into my Excel sheet all the way to placing it in my envelope.

This takes about an hour once you have the Excel sheet set up. Just imagine the piece of mind at the end of the year! I keep a basket for the receipts and my family knows where to put them. I make deposits immediately rather than keeping any cash around the house or on my person. Balancing is done as you go along. It is amazing how much time this saves you in the end. ALSO, pay your bills the night before your paycheck goes into the bank. This way, they are paid and you know how much is left for groceries, going out to eat or before having a fun filled weekend. Btw, start a Christmas club account at your bank and put a few dollars into each week for Christmas, birthdays, anniversaries and other holidays come the same time each year. There isn’t any reason to not be prepared for them.

Hope these tips help make your life simpler. This is my CrockPot version of managing our finances. I know it makes my life easier and it will yours too.

Happy Love Month,
Love, blessings, and {{{Hugs}}}
Rita
Sunday, February 7, 2010 | By: Rita Hutcheson-Cobbs

My Creations for The February {Scrap} Beach Challenges

My Heavenly Father

Be Honest with Yourself by Listening to Your Heart

I can see my Shadow...Which came first, the Embossed Daisy or the Script?
"An artist's illusion is her greatest talent!" ~ Rita Hutcheson-Cobbs

Love My Life...indeed, it was love at first sight!! =)
Yes, this is a cup attached to the paper with the lid visible...totally fun...

Playoffs...Beary Christmas was always playtime in my office when I worked at CRS!!
(That was where all the staff were, Rosemary, when you couldn't find them! LOL)

Superbowl...a layout using a bowl, or two...
Although I do love these little "blessing" flowers made with on bowl...Adorable...

I had a great time in the virtual chat/crop live with my TSB Girlfriends...they have created within me a new love for paper arts. Loving it...

Love, Blessings, and {{{Hugs}}}
Rita
Friday, February 5, 2010 | By: Rita Hutcheson-Cobbs

Love is in The Air...


February is just an amazing month to carry over the themed holidays of the fall and winter. Halloween, we celebrate fun and sweet pleasures by dressing up and having lots of chocolate. Then with Thanksgiving, we have an opportunity to view the blessings and rewards of the year past and to be appreciative of our friends and family that God has blessed us with. We even have the possibilities of praying for our enemies and even to put aside stressed relationships for a month following as we fulfill the Christmas treasures in December. Then New Year’s is a time to put away the old things of our life and seek hope for the coming year that we can be better people and open our hearts and minds to new adventures and possibilities. With each of these holidays, love is demonstrated.

I thought about this…the love that flows evenly throughout the year. God showed His love for us in each and everyone. He gave us the ability to create costumes and celebrate fun, then to offer our best and gathering with others to be thankful and share His gift of love through the gift of giving and receiving. Finally, we have the love of the New Year and promising to demonstrate this love throughout the next year. I am afraid I am repeating myself only to lead up to this month.

Love is indeed in the air. Through intimate love I was created and born during this month. God gave us Valentine’s Day, although the profits of card companies increases in this month more than any other, we can share one day with the one we love to say, of course “I love you,” but also to focus on that one person that makes our hearts soar.

So with this, I submit a challenge…create something with your hands for this Valentine’s Day. It doesn’t need to be fancy, but showing your love with something you made with your own hands demonstrates the time, effort, joy, and creativity of your love for another person. You don’t have a partner, spouse or significant other? Great, adopt a grandparent at a local nursing home or a neighbor or a veteran. The possibilities are endless because love has no boundaries.

Happy Love Month,
Love, blessings, and {{{Hugs}}}
RHC
Wednesday, January 20, 2010 | By: Rita Hutcheson-Cobbs

Trying to find my paper artist style...

I have been playing with various styles of paper, embellishments, and techniques in search of what my paper art style might be. I don't think it is romantic or even as "precious" as the card in the photo above illustrates. I like the vintage but find the darker colors less soothing or encouraging. Bright colors are interesting to work with but the apeal of contemporary is something I might enjoy as well. In the meantime, I will keep playing with medias until I find it. Working with beads, it is easy to define my style, but with quilting I go toward the Civil War patterns and fabric. With wood, I like the darker finish while with yarn, I would rather work with soft "for baby" fibers. In needlepoint, I love the country look, but in paints it is hot pink, chocolate brown, and black. So, what all of this reveals to me, is a mixed up media artist. =)

Sometimes it take experimenting to find our best. The harder we work, the more growth and defined we become. Maybe, just maybe, in all of this,  I will find the respite in paper arts that I am looking for. Therefore, I will press down harder, as the rain outside my window, to wash out the clutter and find what works best for me and what I will enjoy playing with.

Love and Blessings, 
Rita
Monday, January 18, 2010 | By: Rita Hutcheson-Cobbs

Making cards, Crockpot BBQ Chicken & Quicky Cole Slaw Recipes...

I love the little people stamp collection from Stampin' Up! They are so much fun to use in many different projects. Cards are my specialty but I am learning to make mini-scrapbook albums. Just today, I picked up some wonderful scrapbooking items at Big Lots.  Imagine that? Big Lots has a whole section dedicated to scrapbooking items. I can't wait to video my haul, I believe YouTube videographers call it. (Love that big word!)

Paper arts and crafts are indeed fun. There are no limits, no rules, nothing coming between you and paper. You can use recycled items, make your own paper, or even create pages with magazine sheets and paint. The world is your canvas and paper is your media for getting there. I love to make my own paper but time limits my abilities at the moment (I am caregiver for my mother and son...not to mention the Alabama weather is very unfavorable this time of year for someone working outside).

When I am working, simple meals are also great. I can start something in the morning and have the table set by 6 pm each evening. It doesn't always work that way but eating at home saves us time, money and energy, plus it gives me a few more minutes in my studio. I will give you some simple recipes here so that you can try them at home...

CrockPot BBQ Chicken...

Take 6-8 (six-eight) frozen boneless skinless chicken breasts and place them in a CrockPot that has been sprayed with cooking spray (I like the ones made with olive oil). Then pour a 16 oz BBQ sauce over all the chicken. Put the lid on the CrockPot and allow to cook on low for 6 (six) hours. Ready to serve and really really good. This is a Rita original recipe too!!!

I love to read cookbooks but using them to make a meal isn't my favorite hobby to do. Now for the side dish...

Rita's Quick Coleslaw

1 super large head of green cabbage, chopped or shredded (do it yourself or buy the bagged kind)
1/2 a large onion, chopped (also you can buy this already done at the grocer)
2 carrots, shredded (again...well you know what you can do...I use the whole carrot minus the top/greens)
1 Tablespoon of freshly ground pepper (nothing better than fresh ground)
1 teaspoon of fresh ground salt (yes, indeed...I love the flavored salts too)
1 Tablespoon of celery seed (I buy this crushed at the Dutch Oven near Cullman Alabama)
1/2 cup apple cider vinegar + 1 Tablespoon cold water
1 cup of mayo (I like the Kraft with Olive Oil...it is the best ever mayo)
2 Tablespoons of sugar (more or less, whatever to taste)

Mix the veggies together in a bowl by tossing them a few times. Then mix all the remaining ingredients in a separate bowl until well blended and then add to slaw. You may need a little extra mayo, salt or sugar...just dash some right on into the slaw. Serve chilled. (I may not like to cook but I can certainly through some things together that will make you wish I did!)

All you need to add to this meal is a bowl of sliced apples or a few pineapple rings. Done! This is a wonderful meal and cost is less than $15 to make....our family has 6 people in it and we have a plate left over for the next day...pretty good I would say.

Enjoy and have a great Paper Artsy Day!!!

Love and blessings,
Rita

Thursday, January 14, 2010 | By: Rita Hutcheson-Cobbs

Making a Little Notebook by Recycling...

Last night, I watched several YouTube tutorials on how to make mini-notebooks. The ones using recycled items really appealed to me. I pulled one of my coffee collars (love that title used these…from the movie “Made of Honor” which is one of my favorite movies). Thinking of Valentine’s Day next month, I picked embellishments with that in mind.


I took the coffee collar and cut it on each side. This was easiest to do since the fold was already there. Then I traced my patterned paper which was scrap from another project and also traced the coffee collar as a template for the paper that will go inside which was on scrap cardstock as well.


Then I used Versamark and stamped the inside of each portion of the coffee collar. Then I added gold embossing to the inside. I had just got my gold embossing powder and thought it would compliment the paper and the cardboard of the coffee collar. I loved the results.


I placed the patterned paper to the front of the coffee collar. Then I used my 3/16 to punch holes on the end. After cutting out by hand each white page going inside, I punched holes in those also.


The flower of pink and off white accented the patterned paper. Also, I added the chipboard “Love” to the front which already had glitter and painted red. Plus, two hearts which I layered. Then on all these elements except the flower, I added Crystal Effects to make them shine and pop. As you can tell, I am addicted to the “pop” and “shine” of any embellishment.


This project took about 30 minutes to do, but I let the Crystal Effects dry completely before I put the mini-notebook together.

Love and; Blessings,
Rita