Sunday, December 25, 2011 | By: Rita Hutcheson-Cobbs

Candle Lit Glass Block Decor Element...for a lack of better title =)

 Don't you absolutely love it!!! I attended a Craft and Conversation Ladies Night Out at First Baptist Church in Huntsville, Alabama a few months ago and one of the class choices was for this project. I didn't take this class but figured I could make this. So, I glanced over my shoulder ever so often to check them out! ;-) I thought it would be a GREAT idea for our Special Ministries Sunday School Class to make for their family member for a Christmas gift and guess what? It was!!!

I used one sheet of 12x12 scrapbook paper for four blocks, a "pretend" candle that is battery operated (so my kind of candle, folks! A blog story for another day of me burning down the master bathroom...sigh...), a blingy decor piece, ribbon, Modge Podge, and adhesive is all that is needed. 

I used the double sided red tape to spot stick the ribbon onto the glass...

Then I tucked the tape inside the plastic spout. My husband, Jerry,
figured out that if we cut a hole in the center of the plastic spout, we
could glue the candle to the spout and it could be turned on/off without
being removed, thus, the ribbon stays in place...

The scrapbook paper was decoupaged in place and the kids
loved doing this part...

I used E6000 to add this piece...
so love that glue!!!

Beautiful!!
I did have to go several times during the weeks
prior to Hobby Lobby using my 40% coupon getting
one block at a time because they are very expensive to 
purchase...I didn't mind...they are indeed beautiful!! =)

The kids in our class made a couple of things to give their family members for Christmas and enjoyed it so much that we are going to make things throughout the year to have ready for a gallery show to go along with their art journaling. Art is such a wonderful way to express yourself and to give of yourself. We are enjoying this opportunity to share music and art as well as letting these beautiful people know that there is One that accepts them as they are and that there are things they can do and be appreciated for.

From our family to yours,
Wishing a treasured Merry Christmas,
Rita
Monday, December 5, 2011 | By: Rita Hutcheson-Cobbs

Chalkboard Dipped Wine Glasses...Is that right? Hmmm

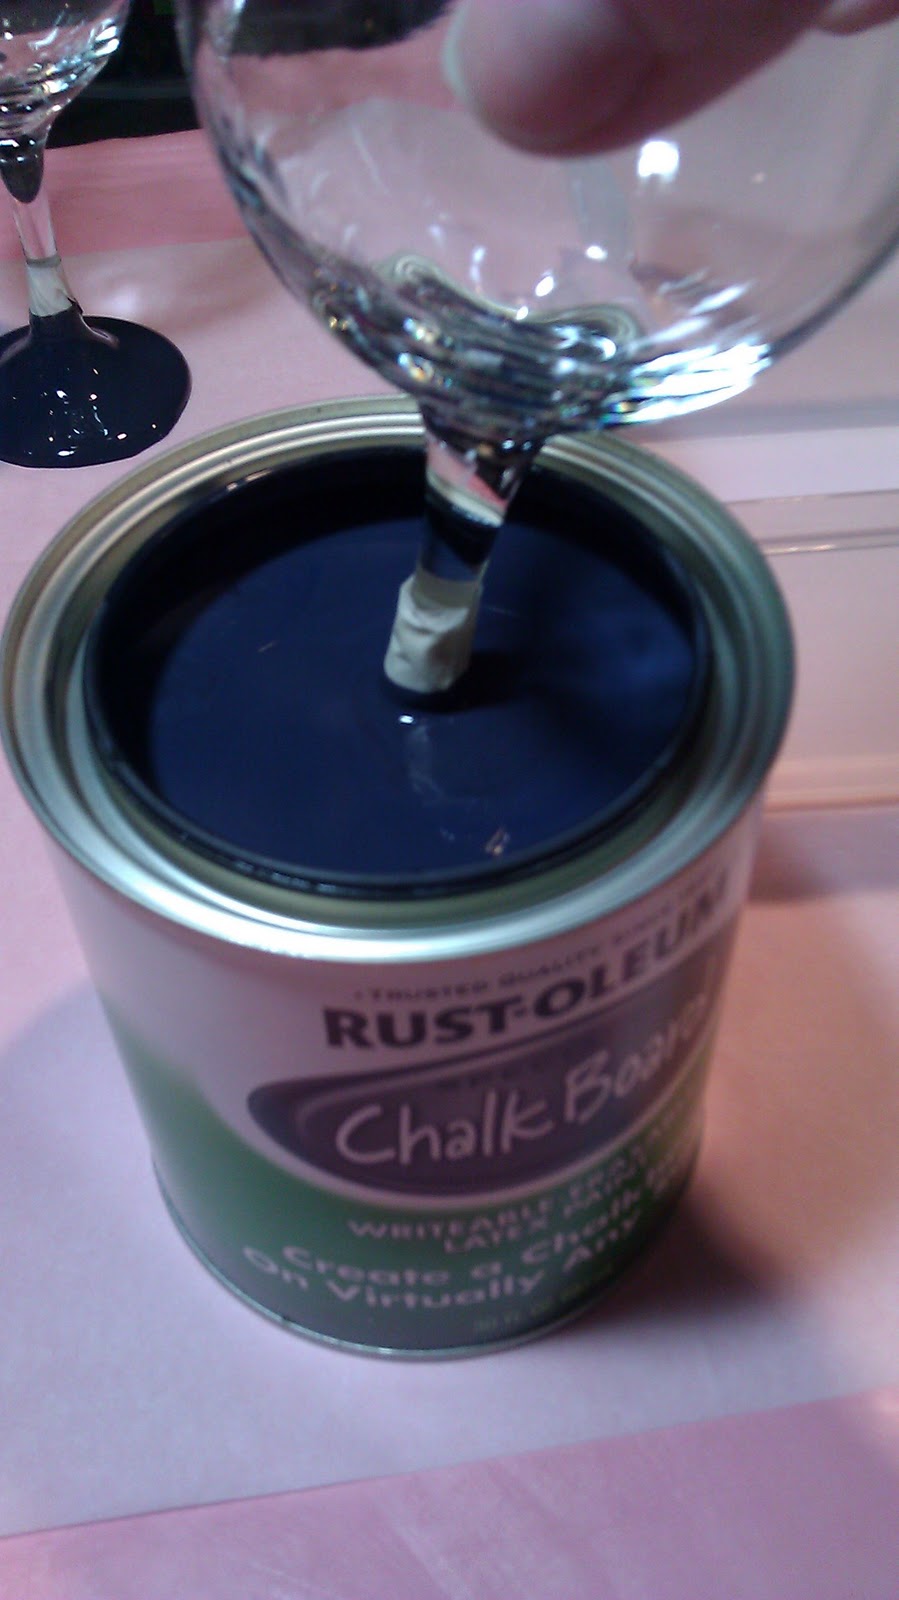
I saw this on Pinterest and had to give it a try...but I have already found a better way to do the whole process.  You will need wine glasses, of your choice, chalkboard paint like that in the photograph, masking tape, a large screwdriver, parchment paper, forget the plastic container (thought I would need it but I didn't), scissors, chalk and twine plus bling or rhinestones if you want them and Glossy Accents or clear glue. So let's get started on this fun amazing project.

Tape the stems of the glasses wherever 
you want the paint to stop...
the next set I do, I am going to the base of the glasses...

Stir the paint up really good all the
way to the bottom of the can...
I got this can which was in a box at WalMart.

Dip the glass into the paint...

Allow the access paint to drip off...
about a minute...

Place the glasses on parchment paper.
Leave them for 2 hours or until dry...
I left mine overnight...perfect...

My husband wanted to see what one
looked like after about an hour...thus the ring...=)

This is what mine looked like upside down even though they were dry...

I clipped the access paint off the edges...

Rolled the sides of the glasses on the parchment paper
to smooth out the edges where I had clipped the access paint...

Done...

Hubby playing with the camera =)

Chalk and the glasses waiting for embellishment...

I added a piece of chalk to two of the glasses
going with a bottle of wine...

I added bling/rhinestones to the edge of the chalkboard paint
for a little sparkle using Glossy Accents to make them
secure...

Our gift includes a bottle wine
from our miracle bush, two glasses with the
creative unique touch where their names can be
written on the base and a delicious handmade card...

What a lovely gift...

No gift from me is complete without bling lol...

...an added touch!! 

Loving it...

Any glass could have the added bonus of chalkboard paint
and no more mixing up drinks regardless of what is in them...

Handmade cards are always a treasure...I love making them...

So, I made these glasses in just a couple of hours on a Saturday night and finished them up before church on Sunday morning. Although, I don't care for wine or beer, I won't apologize for it.  Everything takes responsibility, I just need to learn it when I purchase bling, cardstock, ribbon, embellishments, etc lol...Enjoy...I hope you too can find ways to make beautiful gifts this holiday season for your friends and family and your neighbors. 

Hugs, Rita


Sunday, December 4, 2011 | By: Rita Hutcheson-Cobbs

Rockin' Rollin' Roller Coaster Crochet Scarf Pattern...

This is a super easy fun crochet pattern and will make the most amazing full, long scarf. I am loving wearing this and it is two simple crochet stitches that creates an adorable pattern. I created this scarf because I wanted something full and fluffy to wear AND I so loved the colors!! However, I want to explain that I made it in two pieces so that each end that hangs down has the ripple effect. I will explain in the directions and  I promise, you can so do this!! =)

You will need:

10 oz of fiber/yarn. For this I used Hobby Lobby's "I love This Yarn! Ombre" brand and it took 2 skeins of yarn to complete the project.
Size H crochet hook

ch 33
Row 1: Turn, skipping the first chain, sc (single crochet) in each front loop of chain across, ch 4. Turn.
Row 2:  Skip first loop, the ch 4 counts as your first tr (triple). Tr in the next 3 loops, *sc in the next 4 loops, tr in the next 4 loops * continue to the end, chain 4. Turn.
Rows 3-46: Continue this process until your project as instructed in Row 2, fasten off.
Join yarn to back loop, sc in each chain across. ch 4. Turn. Follow instructions in Row 2 through Row 46, fasten off.

Remember to recycle any remaining yarn or threads. Birds love to build their nests in tidbits of fiber or you can make small flowers for your scarves. Also, many shelters and homes for women use the fiber to make things. Think of creative ways to recycle. Enjoy...

Hugs, Rita
Monday, November 21, 2011 | By: Rita Hutcheson-Cobbs

OMGosh!! An Easy Peazy Pumpkin Muffins Recipe...

 There is no easier way to make pumpkin muffins and they are so creamy and rich without all the calories too! Take a 15 ounce can of pumpkin and a box of buttery vanilla cake mix. Blend together at the cake mix setting on the electric mixer and then spoon into a muffin pan sprayed with cooking spray. Bake at 350 for 15-18 minutes or until golden brown. That's it!!! WOW!

 I found the idea on Pinterest, which I love. I scroll the "everything" page one time and then go about my day. I don't linger on the site because like anything else, it can keep you distracted from what is important, like making these amazing muffins!!! So very yummy!

Hugs, Rita
www.RitaHutchesonCobbs.com
Sunday, November 20, 2011 | By: Rita Hutcheson-Cobbs

Preparing and Baking a Whole Turkey PLUS my revised BBQ White Sauce Recipe...

{Photos are below too...} This is the least messiest way to bake a wonderful juicy turkey and to even do it ahead of time. I have never had a dry turkey, because my secret is...bake that baby upside down! Well, that isn't the real secret, the ingredients, the prep, the slow roast, the cooking, the...well, you will see...This year, I have made two since I found them at such a great price (thanks to my buddy, Suzanne), chopped up the meat, poured the homemade white BBQ sauce over the meat, popped it in the freezer for later. I will thaw the meat in the crockpot and we will have amazing meat after the Thanksgiving holidays. So, let's get started. I will warn you that I have some raw turkey photos in the prep portion of the turkey recipe so you can see how I got my turkey ready...

Items and Ingredients needed for preparing the turkey:
Whole Turkey
baking bag (for the weight of your turkey)
cheap foil roasting pan
1/2 cup or 1 stick of butter
1 whole onion, peeled
4 tablespoons olive oil


Rub Ingredients (Mix together and set aside)
1 tablespoon thyme
1 tablespoon rosemary
1 tablespoon savory
1 tablespoon oregano 
1 tablespoon garlic powder
1 teaspoon crushed red pepper

There is some prep work in getting the turkey ready for baking. First take the whole turkey from the packaging and place it in a clean sink. Remove anything inside the turkey cavity, like gravy packaging or plastic pieces holding the legs together, for example. Then wash the turkey inside and out with hot water. Spray the inside of the baking bag with cooking spray and place the turkey breast side up inside.

 Generously massage the rub mix into the turkey all over,
including between the breast meat and the skin. 
I had to cut the membrane between the skin and meat to 
get the rub inside but you will be glad you did for the flavor...

Place the stick of butter inside the cavity of the turkey.

Then place the whole onion inside the turkey cavity.

 This is what is will look like at this point...
pour the olive oil in the bottom of the bag.

The bag comes with a plastic tie closure...

Then flip the turkey over with the breast meat on the bottom...

...it will look like this...
Bake all night at 250 degrees and then shut the oven off.
Wait until the turkey has cooled down to debone. 

Now for the amazing homemade White BBQ Sauce similar to our famous Big Bob Gibson's but my friend Suzanne Mills suggested I add honey rather than their recipe which called for corn syrup. So, with a few more adaptions...here is my version of the White BBQ Sauce...

White BBQ Sauce ingredients:
1 quart mayonnaise
1/2 cup white vinegar
1/2 tablespoon crushed red pepper
1 cup horseradish sauce
1 1/2 cups of raw honey
1/4 teaspoon salt
1/4 teaspoon fresh ground black pepper

Blend all these ingredients together until smooth. I then poured sauce over the chopped meat in each container I was putting in the freezer and added the remainder of the sauce to the empty mayonnaise jar, shook it up and relabeled the jar and put it in the fridge. My friends, Dee Walker, and her mom, Betty Cummings, shared the tip of chopping up the leftover turkey meat from Thanksgiving and pour white BBQ sauce over it for sandwiches and my thinking was, "Hay, why wait!"

If you have any questions, send me a message here or on Facebook. I may have left something out. I am going to bake another turkey this weekend because the price is too good to pass up! Our family loves turkey meat and it is so good for you. I will make a crockpot version of the turkey breast sometime soon and show you step by step on how to do that, it is perfectly easy as well. 

Happy holidays, Hugs, Rita


Saturday, November 19, 2011 | By: Rita Hutcheson-Cobbs

Quilted Ball Ornaments with No Sewing Required! Believe it!!!

During a resent Craft and Conversation Night at First Baptist, Huntsville, I took two classes and one of them was for a quilted ornament that required NO sewing! I had to take this class just to see it to believe it so to speak...sure enough, the teacher was right. No sewing required. I used a thimble and a what seemed like a thousand stick pins! Each piece of fabric was cut to a 3" square and I simply folded each one and pinned it. I will have to do a tutorial on the step-by-step process because it is easy once you get the first one done. It takes about two hours to complete the project but I image once you get the hang of making them it will move much faster. I love them and plan to make more for memory baskets and bowls. What a great way to use all those scraps of fabric!! Loving it...

Hugs, Rita
www.RitaHutchesonCobbs.com
Friday, November 18, 2011 | By: Rita Hutcheson-Cobbs

Customized Holiday Plates!!

 Aren't these absolutely beautiful!! I am obviously behind in sharing because just over a week ago I took two classes at First Baptist, Huntsville's Crafting and Conversation Night and this was one of the amazing classes I took. I wanted to recreate these plates for our Special Ministries Sunday School class at some point so they could make them for their families ((shhhhh don't tell anyone just in case they do make them)). I fell in love with the fabric covered glass dinner plates! Of course, who doesn't love the messiness of decoupage?! Hello! I do!!!
I have to touch up the edges when I get a chance but still they are absolutely perfect to add cookies too and deliver to a neighbor or give to that hard to fit family member. Then I thought of any time of the year to create a beautiful table decor. The plates may not be washable I don't know but to create a themed table top would outweigh the cleaning process and with enough decoupage, you can wash it I bet, just thinking ahead. Regardless, I am thinking as I type, just imagining how shabby chic my house will look now with all the bits and pieces of fabric throughout the year and if I don't like it, I can just change the fabric. Goo Gone works great as does soap and water. So, holidays here I come with so much mo-jo and creative inspiration that even Santa Clause is sick of listening to me =). How fun everyday life is with me. Art is just amazing and you don't even have to be creative to have an imagination. =) just saying...If you don't think you have an artistic thumb, come sit by me, I will share.

Hugs,
Rita
www.RitaHutchesonCobbs.com
Sunday, November 6, 2011 | By: Rita Hutcheson-Cobbs

Introducing my newest collection, Madison Bows!!

 I haven't made bows before, but when my friend Dee asked me about making some for her daughter, Madison, I couldn't say, "No!"

 I replied that I would most certainly give it a try. Little did I know that life would happen and it would be several months after she gave me samples of what she wanted before I would actually get them made...

When I would see her, I would explain why I hadn' t got to making the bows just yet and she would say something like, "Oh, I understand that an artist has to have the mojo and inspiration to be creative." OMGosh, did I feel speechless...me! "No, not really, I would think"...just life happens lol.

Life indeed does happen and just like this experience, timing is the ultimate.

I took a class with my friend Beth who brought in a teacher for this bow and those following. I have since made several in various fibers and ribbons and love them all. 

 This one reminds me of the bells of life chiming with happiness and pleasure that my life of "hoarding" in the physical, spiritual, emotional and mental is over. I am refreshed and renewed, ready for the newness of the day and the morrow.

 In my hoarding supplies I found tons of the clips. Now I don't have to go buy any for this project. I have buttons on hand that work perfectly. Now, ribbon may be a must purchase. We shall see about that though...

 The jury is still reviewing the headbands...I want to play with them some more before I introduce them to my friend Dee and Madison. Imagining several designs and drawing them out to see what Madison Bows will feature over the holidays and spring is so much fun. I love bringing fabric and fiber together while adding bling and glitter into the picture. At any age, they are all such fun...

Colors are everything and earth tones are mine. All the bows can be changed to a brooch in a blink of an eye and would be perfect for any event. I am in love with this new adventure of Madison Bows and can't wait to see where this path leads. Thank you for sharing this with me too...it is sooo much fun to make them. Having all boys, I have never made a bow in my life so making these I can do so for any girl or for myself but then I thought of all the paper arts I do and these would look great on any mini scrapbook album I make! =)

Hugs, Rita
www.RitaHutchesonCobbs.com