Monday, March 5, 2012 | By: Rita Hutcheson-Cobbs

Madelyn's Mini Scrapbook Album: Recycling a CM Portfolio Album into a Mini Scrapbook Album...

This was one crazy creation! I purchased a regular $1 photo album and then took a 4x6 Mariposa paper stack and added some photos to the papers and then a single layer of embellishments. Nothing fancy. The photo album was so thick it was frightening and wouldn't close! LOL. So, I got a Creative Memories scrapbook album ((hear me yell "scrapboook album"...)), one would think this would work, right? NO! IT wouldn't close either! ARGH!! So...look what I did to it...=) I am such a creative type...

I totally took the album apart and put it back together again! I cut the stitching out of the center of the portfolio which was designed to hold photos only, apparently, and then cut the fabric pages in half, but, I am jumping ahead...I made new covers for the album by covering cereal boxes as my chipboard with decorative paper then added rings to hold the cover and pages together.

 To create a better page, I cut strips then scored them in half, used one of my favorite decorated punches to edge both sides. Well, then if you know me, I had to add the tab punch to create the binding for the rings. Perfect!!

 I added simple embellishment to the pages and the photos can still be changed if my mother, the recipient of this mini album, wishes to do so.

This album is of my great-niece and my mother's first great-grandchild and she had no photos of her. So I made this album for her on Valentine's to take to the beauty shop, to church or her sisters homes to share the photos.

I love the Mariposa papers because of the butterfly theme it carries and that is my mother's favorite character. So I used it throughout the book. 

I also used some of my stash of stickers for embellishments...

I clipped butterflies from the paper to use here and there too...

I didn't journal on all the pages but did label a few...

My mother has Dementia and Alzheimer's and 
I felt labeling some of the photos would help with her memory as time goes on. 

Here is one page where I clipped on corner of the butterfly
and raised it, slipping the photo under it...

Love the corner rounder on only two sides of this photo...

As I said earlier, I kept the embellishments simple since
the paper collection speaks for itself and I wanted it
to be something easy to carry in a bag or purse.

Again, I used a cereal box for the back cover...
adding decorative paper...

Should my mother lose it or leave the mini album somewhere, I went ahead and added my business card to the back. I don't normally do that to my creations, but felt this was important for her situation. I wanted my mother to have something that was important to her. Right now, mother has some really good days for the most part, however, she dwells on things and gets fixated on something. So, I try to take care of whatever is bothering her so that she has peace of mind. One of those things was that she have photos of her great-granddaughter, so I knew I could fix this album for her. It was my gift to her for Valentine's Day. I love my mother and she is so happy which makes me happy. God blessed us with giving us these final days with her ever how long they may be.

When something doesn't quiet fit together, I simply make it work. What have you used lately that didn't  quiet fit but you revamped it to make it work?


Hugs, Rita
Monday, February 27, 2012 | By: Rita Hutcheson-Cobbs

God's thumbnail scrapbooking layout...

Even though this was Trunk-a-Treat 2011,
I couldn't wait until Halloween season to share this amazing 
photo memory with you...

Garrett enjoying the dinner after our Halloween event
at church. Garret holding baby Abby...
Did you guess, Garrett went as an AL football coach?!

Garrett was sitting by my van which for the Trunk-a-Treat handing out candy when just at sundown he looked up and said, "Momma, look! It's God's thumbnail! Take His picture!" I had to take his picture and God's! If you can see the reflection in Garrett's glasses, you can see the moon shining brightly. Garrett has always been fascinated with the moon regardless of it's shape.

Hugs, Rita
Sunday, February 26, 2012 | By: Rita Hutcheson-Cobbs

Finding my Fitness Passion while Scrapbooking a bit =)

"Coach" Scrapbooking Baseball Layout
Garrett listens very well to what the coaches tell him to do...
I try to be quiet from the stands but sometimes...it is so hard...lol

My poor photography of this layout just doesn't do the layout justice...
I have extra room to journal or I even thought of asking the coaches to write a note to Garrett...

Using my stash aloud me to add simple baseballs to make the title pop...

I have plenty of space to journal by using a ledger page...
I can add how I teased the catcher or pitcher how I loved their shoes or offered to make them banana bread if they wouldn't get my kid out lol...Garrett loved that. I even threatened to break our barber's scissors once when he was the catcher for the other team...All in the fun of the game. 

Garrett gets amazing exercise and his legs are tight muscles, no fat and you can't even pinch an inch! We have always been in awe of that about his body build. I want to be fit like that too. As I think about  what I want in being fit I have to ask myself, what is my fitness passion? Then I look back in time to answer some important questions...

As a child and early teen, I loved my bike. I had a 3-speed Sears purple Free-Spirit bike. I rode it everywhere in southwest Decatur. Cycling may be my passion today. Could be, I don't know. It is something to consider that's for sure. However, when I think about things I haven't liked in the areas of fitness, walking pops in my mind. I feel stressed all over my body; also, I don't think I will get the alone time I need if I decide walking is to be my exercise nor the quality I want for my whole body. Then there is the land exercise...I hate land exercise and won't stick to it. I do love the water but just can't get to the gym, it is getting harder and I can't put in a lap pool at this time. What about happiness? Well I am most happy in nature, I feel refreshed. Sadly working out first thing in the mornings, EARLY, is awesome, then showering...crazy since I am not a morning person. As for goals, I want to be fit and healthy forever, stress free and be available to my family and to my art. I want to create, I have so many ideas and feel if I am cleaning my palate inside and out then I will be creative without and within. Having this said, I think I know where my fitness passion will head, but I will experiment with some other avenues because one never knows where adventure may be...

Hugs, Rita
Friday, February 24, 2012 | By: Rita Hutcheson-Cobbs

Getting reading for Baseball Scrapbook Layout

 We are so ready for baseball/softball season! I just filled out our first form yesterday for Garrett to play special needs softball, the first league of this type he has played on in about five years. He will also play on the church league which is what these photos are of in 2011. He LOVES playing ball and is actually very good at it, very focused. Now for a closer look at each page layout...

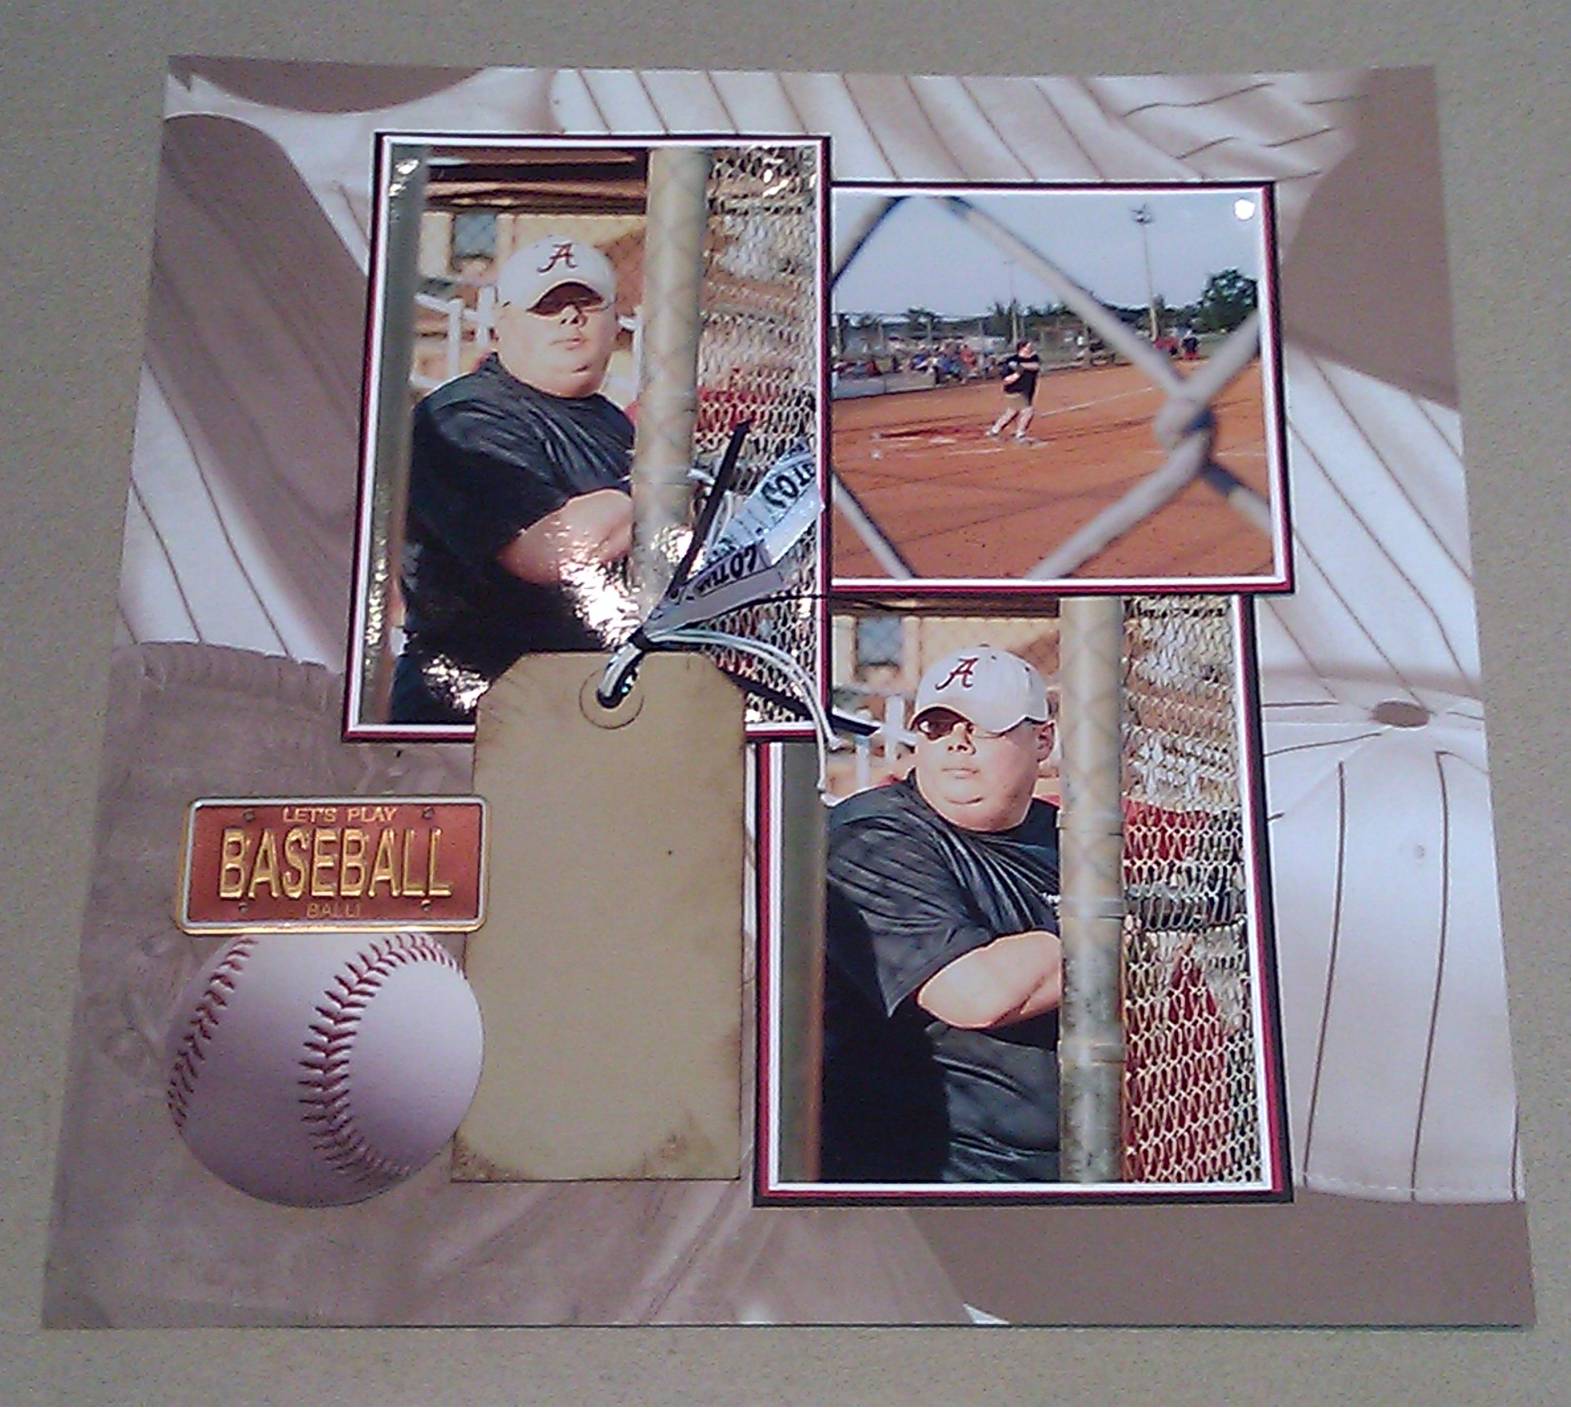
I made a pocket behind the largest photo and added a tag so that I could journal about the many games and things Garrett said throughout the season. Then I added smaller photos that I cropped down, taking away the background so that I could see every photo of his face and action of the practice sessions. I wanted that in these pages. 

The guys and gals were awesome working with Garrett during practice sessions and I wanted their faces to be present on my pages too, not just Garrett's. I am so glad that although I am new to scrapbooking, I have started putting my photos on paper, embellishing them and creating fun ways to remember each and every photo.

Let's play ball!!!!
hugs, Rita

Wednesday, February 22, 2012 | By: Rita Hutcheson-Cobbs

Crochet Poncho II with Pattern Links

I hear you saying it, from here, as I type this blog!! "OMGosh! You have made yet another one? Why?" LOL, so that I can become a poncho, leg warmer wearing crazy lady (aunt to some) LOL...that is the way I want it of course. Plus it doesn't hurt that the ponchos cover up a multitude of sins, as they say!

When I was making this poncho, I left the pattern I used to make the last poncho I made at home. So when I got down to row 19, I wasn't sure if I was suppose to end it at row 20 with the granny square stitch or row 29...so I kept crocheting to row 30. I loved the length tremendously!! So if you follow the pattern and want the longer length, add a skein of yarn to the amount needed and continue to row 30 before finishing off. For crochet beginners, I do have basic beginning videos on my YouTube channel...

Happy crocheting, 
Hugs, Rita
Monday, February 20, 2012 | By: Rita Hutcheson-Cobbs

Batter-up Baseball Scrapbook Layout...

When the scrapbook industry gives you an album that is theme based and offers not only the cover but paper for you to embellish with your own stickers, photo mats, photos and other fun things, then it makes a beginning scrapbookers life much easier LOL! I won this album at a retreat many years ago when I was still just making cards. Baby, I have come a long way...now a mixed-media artist!!?? For real, a long way...

My goal this year is to use my stash...
I found the metal tags and it was perfect for this themed album...
I love the Stampin' Up punch which makes it easy to label
my photographs...

I use the photographs that are a bit blurry because for me they tell a story...I am not a great photographer and sadly find the articles about how to make my pictures better a bit boring. I suppose if I took a hands on class, I might enjoy knowing the ends and outs of photography much more. However, I just like taking my camera, pointing and shooting wither it's my large digital camera or my cell phone lol...

Hugs, Rita


Sunday, February 19, 2012 | By: Rita Hutcheson-Cobbs

Batting Practice Baseball Scrapbooking Layout...

I wanted to capture every factual expression Garrett had to offer...

So using the Creative Memories Cutting System worked perfectly for a mosaic layout...

He loved playing church league last year and is ready for the new season...

 Will they bat us home or bat us into the field? 

Hugs, Rita

Saturday, February 18, 2012 | By: Rita Hutcheson-Cobbs

Baseball Scrapbooking Layout for anytime...

There are many things in this world that happen but few of them compare to sports much less matter. Garrett loves sports. It doesn't matter if it's baseball, softball, NASCAR, basketball, football, whatever, but there is one thing that is tremendously better...getting to play! This past year, our church started a men's softball team and joined the county league. Garrett was in heaven, pardon the pun. One of our ladies, Ally, caught some amazing shots of him at the field and I wanted to capture them on my pages. He is very focused when it comes to playing sports so you will see that I brought almost all my photographs onto my pages...but this one...just captured his soul...he was focused...

Which made me wonder, when am I this focused on what really matters? Do I instead turn my focus on myself? That's not what the game is about. The game may be a circumstance or a situation, a decision or a choice to be made. However, am I thinking about me during the present moment, what will benefit me? That isn't what the game is about either. It's about the team players, it's about the field before us and what will bring us from first base to second, to third and safely into home. It's about how we will make it through all the obstacles along the way while keeping our focus on the prize before us, smiling and being joyful seeking praise in the One who is our ultimate coach. For in that and only that will we reap the benefits of winning the game.

Hugs, Rita
Friday, February 17, 2012 | By: Rita Hutcheson-Cobbs

Elephant Card using left over scrapbooking kit supplies...

During a scrapbooking retreat I recently attended, my friend Judy Hardwick purchased a cute kit that included this fun elephant Cricut diecut and the sweet piece of paper scrap was a bonus she didn't use. I trimmed the paper and used the animals from the left over paper to make the inside decor elements. There was only a small tiny piece of paper to recycle (or toss if you weren't me lol). The circles behind the tiny animals are from some Halloween paper scraps in my stash box. Isn't he adorable!!! I am sending this to my sweet afternoon buddy, Madison. I think she will like getting postal mail, especially this little friend =).

Happy Creative Weekend...
Hugs, Rita
Tuesday, February 14, 2012 | By: Rita Hutcheson-Cobbs

Valentine Belly Bands for Sweetheart Candy Boxes!!

My sweet friend, Madison, and I made these adorable Valentine treats for her classmates at school. The candy boxes as well as the Valentine cards with stickers came ready for us, we only had to decorate them. I cut 2 belly bands for the boxes, 1 measuring 8"x3" and 1 measuring 8"x2 3/4" and scored them each at 1 3/4", 2 1/2", 5", 5 3/4". Folded them and then adhered them together. I placed them around the boxes and adhered them down. We placed the card at the top of the front of the box so some stickers could be placed at the bottom of the box for decoration.

On the back, I placed a punched out square so I could add a "To:" and "From: Madison" so that we could personalize each one with the names of her classmates. These were such fun to make and super easy! It made them a bit more fun and gave them something they could enjoy or take home. Madison was able to help me by adding the stickers and placing the squares on the back. She helped me adhere the pieces in place as well. I showed her how to score the papers...talented young lady!! Loving it...

Happy Valentine's Day!!
Hugs, Rita


Monday, February 13, 2012 | By: Rita Hutcheson-Cobbs

Recycling Starbucks Coffee Bottles into Valentine Gifts...

Recycling is rockin' awesome! It gets even better when you make them not only pretty but functional. Items can be made for guys and dolls, boys and girls, all it takes is a bit of paper and embellishments and of course, candy!! =) Unless you are an artist or hobbyist, then you can add some fun treats to the jars that will enhance that person's creations...

I traced the lids, cut the base circle,
then used a scallop punch for the next layer,
adhered them.
Then added punched hearts to that.
Sweet...

For the sides of the lid, I measured
black ribbon, cut it a bit longer and
adhered it using my ATG gun...

The first layer of belly band measured 9 1/4"x3 1/2".
I cut as many as I needed.
The second layer of the belly band measured 9 1/4"x3".
I adhered that on top of the other belly band.
 Then I adhered them onto the jar. 

Filled the jars with candy, 
something that children can even help with.
Buy extra...for munching lol...

Add a sweet tag and you have a wonderful gift!!
Madison and I made these for my New Center Scrapbooking Girlfriends
and her teachers at school...we had soooo much fun doing this together!!!
Btw, we didn't remove the labels on the bottles...too lazy...lol...

Enjoy...
Happy Valentine's Day!
Hugs, Rita


Tuesday, February 7, 2012 | By: Rita Hutcheson-Cobbs

Simple Pot Roast with Recipe...A Guy Meal through and through...

I suppose you could say this was another one of my "firsts" for 2012! I had never ever made a pot roast on the stove top. So, I decided it was time. The thing that surprised me most was how easy it really was. The thing that disappointed me was how tasteless it was. So I am going to share with you is how I made some changes to create a much better flavored pot roast the next time and in the future I have some other ideas for stove top pot roasts. Now, give me a crockpot, I am so there...but we must grow, right? right...

Here is the link for the basic recipe which is great because there are also photographs to go with the recipe:

At step 1, add 1 teaspoon each of Cilantro and Thyme to the rub. Then at step 2, I added one (1) cup of apple cider wine rather than 1/2 cup of red. If all you have is red, then increase the amount to one (1) cup. Also, add 1/4 cup of Worcestershire sauce and button mushrooms. Finally when the meat is ready to serve. I add a dash of the wet liquid over the meat on the serving dish to give it that flavor. I didn't have a lot of fat floating in the liquid because I made very sure I had a lean piece of meat to begin with. 

Eventually I want to give various BBQ sauces a try along with a 24 hour rub down as well as a twice backed style...there are so many options and even though I am not a big meat eater, I have a great man that should have been a beef judge for sure...=)

Hugs and happy eating, Rita
Monday, February 6, 2012 | By: Rita Hutcheson-Cobbs

Madison’s Snickerdoodle Cookie Recipe using Cake Mix

WOW! These cookies are fantastic! I had never made
any with cake mix as a base before but...
WOW! OMGOSH! WOW!
(if anyone in my family recognizes this plate, 
although it is beautiful, please come pick it up lol
I don't know where it came from...)

The original recipe was very gooey so I had to revise it a bit... 

This was my first time to use parchment paper that I could
remember lol...can you imagine! It was wonderful, folks!!


Madison’s Snickerdoodle Cookie Recipe
 using Cake Mix

1 box Duncan Hines Butter Golden cake mix
¼ cup real butter, melted
2 extra large eggs
½ teaspoon ground nutmeg
1 cup self-rising flour, sifted

For Rolling:

¼ cup sugar
2 teaspoons ground cinnamon

Instructions:
  1. Preheat oven to 350 degrees.
  2. Line your baking pan with parchment paper or spray it lightly with non-stick cooking spray.
  3. In a large bowl, place the cake mix, eggs, nutmeg, flour and mix well with a wooden spoon. Then add butter and mix well. The dough should be stiff. If not, add a bit more flour until the dough is so. You want it where you can roll it with your hands.
  4. In a smaller bowl, combine sugar and cinnamon.
  5. Shape dough into 1” balls by rolling them in your hands. Then drop them in the sugar/cinnamon mixture, coating them well.
  6. Place the balls about 2” apart on your cookie pan.
  7. Bake for 10-12 minutes or until edges are pale golden and just set. The center will still be soft to the touch. Don’t over bake them.
  8. Remove the cookies from the oven and allow to cool for 1 minute. Then transfer them to a wire rack or plate to finish cooling before serving or placing in an airtight container.
I would say this recipe makes “X” number but we tend to eat so much of the dough that I never know how many cookies it will make for sure. 

Why did I call these "Madison's" cookies? Well, a friend of ours asked if their daughter could come over to our house after school and we were like "sure, the more the merrier!" So I made some homemade cookies for mother, Garrett, Ethan and I to enjoy and these were them. I have made them again since that day but DOUBLED the recipe since the first batch didn't make very many. I have also decided that since they are bit sweet to maybe add real vanilla bean ice cream sometime. Wouldn't that be just yummy! Enjoy...let me know what you think and send me some photos...

Hugs and happy eating, Rita
Sunday, February 5, 2012 | By: Rita Hutcheson-Cobbs

Love you so Scrapbook Layout Pages...

Scrapbooking yourself and even with the one you love
isn't always a priority I have found, at least for me it isn't...
So, I decided these photos were my exception!! 
Yes, this one in the bottom corner has a story...lol

The background papers were given to me by an
amazing friend who is also an amazing photographer,
Danielle Wood. The papers and embellishments, I got
from {{gulp}} I know you won't believe me, but came
from Wal-Mart...less than $5...

I made pockets behind the photographs
to house tags so that I could add
a bit of journaling...

The pull tabs for each of the tags are
flowers and brads that match the paper kit...

I used a layout suggestion from the "Magic" book
from Close to My Heart but changed it a bit. 
Now for this photo...

A friend of ours created the Sci-Fi photograph using photoshop! LOL, I really don't think I will ever be able to wear such an outfit...the photograph was perfect for the scrapbook page though...

Hugs, Rita